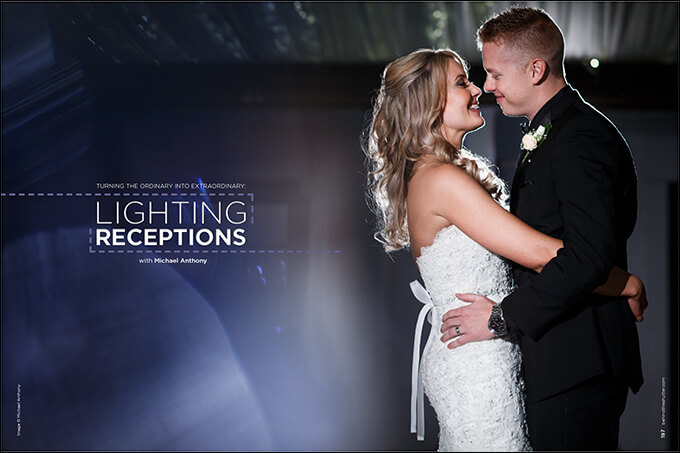
Turning the Ordinary Into Extraordinary: Lighting Receptions with Michael Anthony
Lighting challenges are present in almost all aspects of the wedding day, but seldom do photographers face more problems than when they light receptions. There are many reasons for this. First, receptions often take place indoors or outdoors in the evening in very low-light environments. Second, we often encounter mixed lighting situations, or, at best, we may have a single dimly lit tungsten environment. Lastly, every aspect of the reception is going to be documentary-based, so having control of your environment is pretty much out of the question. Nonetheless, it is our job to ensure the client receives a professional, quality product, and that means we have to be at the top of our game even when circumstances are hard.
As with most things in photography, there is no “one size fits all” for every situation, but there are simple rules that will make your job easier.
Going into photographing my first wedding, the only area I wasn’t comfortable with was reception lighting. I read Neil Van Niekerk’s Off-Camera Flash: Techniques for Digital Photographers three times leading up to my first wedding. Unlike many photographers, I did not start in wedding photography by second shooting for other photographers, so everything I had set up, I had done so on my own without knowing what the outcome would be. Over time, my setups have evolved to account for some of the problems I ran into early on, but the foundation of how I shoot most receptions is still the same.
Equipment for Lighting Receptions
I primarily rely on four Canon 600EX-RT’s or three Profoto B2’s plus one Canon 600EX-RT, depending on if I am working with a second shooter who is using my lights. (The B2 has a much faster recycle time, but requires you to use a third-party trigger like the PocketWizard with your on-camera flash.) The key is that your lights remain mobile. You have to continuously move your off-camera flashes around all night long, so don’t be tied down to cords plugged into a wall. The other thing is that you don’t want to be too top heavy. If a guest knocks over a stand, a monolight could do considerable damage to someone’s head.
Use sturdy but light stands. I recommend the Manfrotto 1004BAC. You need at least three of them to cover most environments. Get Manfrotto umbrella adapters and a good hot-shoe adapter.
You can use any type of light source you want, but just make sure it is reliable and you can trigger it via radio. Do not rely on optical slaves for reception lighting.
Keep in mind that you will need to have flash on your camera at all times during the reception because you will not always be able to place subjects within the bounds of your off-camera flashes. Your trigger on-camera must be able to control your off-camera flashes remotely.
Light Settings
Your settings will always vary, but you’ll want to keep two things in mind. You need to balance the ambient light in the room with the flash power from your lights properly. This ensures less contrasty shadows and a better overall aesthetic. Shoot at f/4–f/5.6, because in these fast-paced environments, you want your subjects in focus. This means you will likely need to bump up your ISO quite a bit, which helps keep a moderately quick shutter speed and conserve power on your flashes so you are not running out of power on your flash at inopportune times.
Light Color
One of the biggest problems I see with photographers lighting receptions is that their flash light is competing with the ambient light and creating a mixed-color situation. Ninety percent of the receptions we shoot are in an incandescent environment. This means you should be matching the color of your flash to the light in the room using CTO gels. If you retain even the slightest amount of ambient light and use an unbalanced flash color, you will run into problems with color. Have gels available for all your flashes, as opposed to just your on-camera flash.
Lighting a Dance Floor for First Dance and Parent Dances
Here you will see my basic lighting pattern for first dances and parent dances. You will notice that I use three lights positioned in a triangular format on the dance floor. I also turn off my on-camera flash because it’s understood that the couple will likely be dancing in the center of the floor. If your couple is coordinating their dance and will be traveling throughout the dance floor, you may need to move your lights out a bit farther, but most of the time, my lights are positioned around the edges of the floor.
There are two things you need to consider when choosing your shooting angle. The first thing is your background. Pick an angle that allows you to shoot into uplighting or into a darker environment. Using off-camera flash actually allows you to hide some of the clutter commonly found in a reception, but if you choose the wrong angle, you will just add to it. Avoid an angle that forces you to shoot into the spill area of your flash.
Typically, if a room is rectangular, you should shoot toward the part of the room that is farthest from your flash. If your couple chose uplighting, you will get great results with this technique.
The second thing you need to consider is the position of your couple in relation to your light. I always tell couples that did not coordinate a dance to do two things: Keep spinning when you are dancing, and stay at the center of the dance floor. I also instruct the bride not to bury her face in the groom’s shoulder, which causes bad shadows on half of her face as the light comes across the groom’s shoulder.
You need to time your shots to get the best possible light on the subject’s face. This takes a lot of practice, and eventually you will find out the best time to shoot for your particular light pattern. Keep in mind you will need to adjust your light position if your angle and light are not lining up correctly. You can use one of your off-camera flashes as a backlight, but be careful of the fly-away hairs that the backlight can accentuate. I learned this from placing way too many retouching orders when designing a client’s album.
Lighting Speeches
Usually after the first dance or parent dance, the DJ will move right into speeches. This is why mobility of your lights is so important. For speeches, the couple has their backs to a wall somewhere, and the speaker will either be out on the dance floor or right next to them. Either way is good, but you have to light them both correctly. We use two lights off-camera, and no on-camera flash.
The trick to photographing speeches is to make proper use of angles. Position your lights at a 45-degree angle to the subjects. Avoid getting the light spill that hits the wall into your composition. This usually means you will have to get close to your subjects and shoot at a 90-degree angle from the light source.
When lighting speeches, it is important you are telling the story for your wedding album. Get photographs separately of both the speaker and the couple reacting to the speech. You could do this all in one shot, but I have found it to be less visually impactful on an album spread.
Time the subject’s action/reaction in order to get the most emotional moments of the speech, and keep in mind that the couple will embrace the speaker at the end of the speech. Don’t miss that moment.
Lighting and Shooting Dancing
I love shooting dancing shots for our clients. I will warn you that most of the dancing images don’t make it into the client’s album, but it’s a great way to make sure you are covering all of the guests and the action at the wedding. I typically use the same lighting diagram you saw from the couple’s dances, but instead of a triangular pattern, I remove one light and use cross lighting. This allows for better integration with my on-camera flash.
I also move the flashes into a less obstructive place farther back and higher up. This is when I activate my on-camera flash, because the tendency of drunk Uncle Joe flailing his arms about can create shadows on my subject’s face.
I always point my on-camera flash over my shoulder in the same direction the subject is facing. This ensures that when the light bounces and comes back down, we have perfect short-side lighting on the subject’s face.
Dancing shots take patience. Wait for the right moment, lock focus and take the shot when you can get the best reaction. If you miss, no big deal—shoot again, but when you lock in a subject, work to get the shot you want. Don’t be afraid to interact with guests to get the moments you want.
Do not use a 70–200 from across the room. It’s lazy, and you will never get the results you want. Your composition will be off and you will not show the action. Instead, grab a 24 or 35mm lens, and get a handshake’s distance away from your subject. The wide angle emphasizes your subject while telling the story in the background.
Lastly, back-button focus is crucial to capturing the moment. The reason for it is that you can line up your composition and wait for the moment to happen. If you are using the shutter button for focus, and the subject moves when you line up your focus and press the button again, your camera will refocus and the moment will be over. I am a strong believer in using back-button focus because it allows you to create better compositions and wait for moments to happen.
Shooting Details
Shooting detail shots in low-light environments can be a challenge. When building relationships with vendors, you will be judged not on the shots of people you take but the quality of your detail shots. If natural light is not available, make the lighting on your details look as natural as possible. We use video lights and longer exposures on our details, but if we need to create dimension, we get out the speedlights. Use flash for a detail like a cake. Cross lighting looks great on a cake.
Being able to work in low-light environments is something every professional should be able to do. It shows potential clients that you have a well-rounded skillset. The reception images usually close out an album, so having good-quality reception shots is essential to delivering a professional final product.