Kicking Ass with the Canon 5D Mark IV in Lightroom CC with Dustin Lucas
Want more information on this article? Get access to video content and additional supporting images. Launch the December issue of the magazine by logging in or signing up for a free account by clicking here. Shutter Magazine is the industry’s leading professional photography magazine.
Whether you are a photo enthusiast or a professional photographer, you are continually being sold on the fact that you need new gear and features like new and improved image sensors, low-light capabilities, better autofocus, 4K video, movable display screen and touchscreen, just to touch on a few. Yes, it’s that time of year when camera vendors are shoveling out their new and improved, latest and greatest updates to their flagship camera bodies. There is nothing simple about the update to the Canon 5D series. Welcome the fourth model, the 5D Mark IV, to the industry.
Now, you may be saying it’s a meek comparison to the Canon 1DX series, and you are right in some regards. The 1DX Mark II has fewer pixels, meaning they are individually larger, hailing in low-light sensitivity. It has a completely built-in-grip body, better battery life, etc. Being a Nikon guy myself, please save the boos for after the article; it says a lot about the fact that the Canon 5D cameras are used by the majority of wedding photographers. This is not just a coincidence or a marketing scheme. It’s pure and simple: The Canon 5D Mark series is the professional standard.
Reader disclaimer: I will not be covering the trademarked Dual Pixel feature of the Canon 5D Mark IV for now due to Adobe’s lack of support. You never know when they will release it when their response is “We’re working on it.” Remember the change from Adobe Lightroom 5 to CC, and how slow it ran? It took until version 2015.7 to resurface Smart Preview to the performance panel. Not to mention the video performance upgrade that made things even worse. With the newest update, you can actually open your Canon 5D Mark IV Raw files—no more converting to DNGs.
ISO and Dynamic Range
After we import our Raws and build 1:1 previews, we are ready to start examining the ISO sensitivity and pushing the advertised 13.6 Evs, or exposure values. I am not going to get into a scientific debate; you can get all that data from DXO’s website, www.dxomark.com, if you are interested in how this compares with other camera bodies. I am more interested in how this camera performs while photographing clients. We will be looking mostly at dynamic range and what Lightroom processing allows us to get before a heavy amount of noise is introduced. We will discuss noise reduction later.
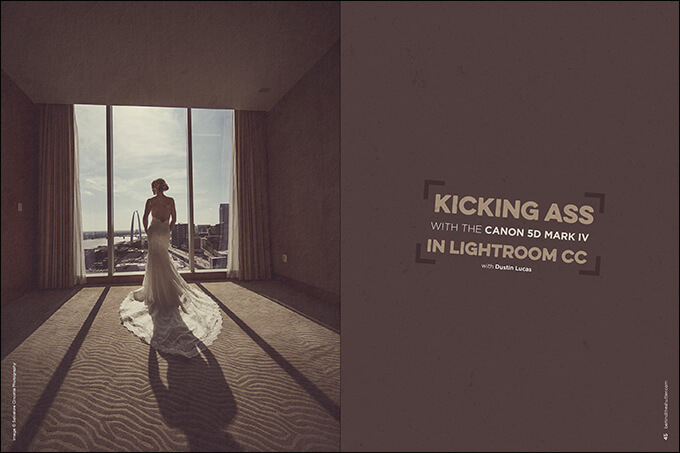
Here we are looking at a silhouette shot at ISO 50 in front of a hotel room window. (1) Based on our camera settings at capture, the shutter speed was 1/1,000 of a second; with an aperture of f4.0, we are about 1/3 stop brighter for exposure than the “sunny 16 rule” would calculate. Sunny 16 is a fundamental rule when photographing in bright daylight: When shooting at f16, our ISO and shutter speed should match. In this case, the shutter speed would be at 1/800 of a second, but details are everything, from the bright blue sky to the shadows on the bride’s back. (2) This image is staged to be a silhouette, but as you can see, by lifting the exposure 1.5 stops, we begin to add in just enough shadow detail. (3) To add even more, we can lift the shadows, but remember that you are flattening the contrast. (4) This is not always an appealing tactic.
Dropping our highlights down to –100, we start to get our sky back to “shot out of camera,” or SOOC. (5) I am not advocating for a high-dynamic-range, or HDR, stylized edit for this image; I just want to show you the capabilities with this Raw exposure. We have the most dynamic range at this lowest ISO setting. The idea here is to attempt to edit this image closer to how this looked in person. (6)
Resolution and Details
Moving away from exposure values and dynamic range, we now want to examine the 1:1 pixel perspective along with the details of the image. (7) This is why we built 1:1 previews and are linked with the Raw file instead of Smart Previews. (8A) This camera’s 4480×6720 resolution can be utilized to its fullest potential here. (8B) Remember that we are viewing a Raw image prior to it being rasterized and actual pixels assigned. We are able to view the native resolution and essentialy get the most flexibility out of the image at this stage.
Starting at the bottom of the frame, we can see the softness in the carpet due to the wider aperture used. (9) With wider-angle focal lengths, the depth of field is greater from the start versus a longer focal length. F4.0 is the lowest aperture available, and it allows the entire dress and subject to be tack-sharp. (10) You wouldn’t want the city to be as sharp as the bride here—emphasis on your subject. (11)
Moving down to the Details panel in Lightroom, we are tempted to fix the sharpness based on the falloff of the lens and the anti-aliasing filter. At first glance, this image is really sharp in the details of the dress, but with all the shadow recovery, we added some noise and could use some sharpness at the edge of the frame.
First, let’s add some luminance to soften the skin. Make sure to remove any color noise. Since this image was shot as a very low ISO, we shouldn’t have any noise, right? Remember that when lifting the dark tones, especially with shadow recovery, you are introducing noise to add detail in an underexposed area. (12) Lower ISO settings greatly help, but you still have noise. Once we have those settings dialed in, we can balance out the softened effect by adding some sharpening. (13a, 13b)
In Lightroom, under the Sharpening panel, the setting is defaulted to 25. By adding roughly 50 to 60 points, we can start to see the difference before the image looks artificially sharp. (14) When you hold Option or the Alt key while adjusting this slider, the image changes to grayscale. You can focus in on the details without the color tones getting in the way. (15) This panel is comparable to working in Photoshop and what is known as Input Sharpening.
Refer to my previous article, “Attention to Details: Better Results With Sharpening,” for more on this topic. Lightroom’s inability to adjust lens sharpness falloff is an issue. Maybe another article about Capture One is needed.
Using Camera Profiles
In the Camera Calibration panel settings, you can adjust the standard profile provided by Adobe to the emulated Canon manufacturer profiles. These are designed to emulate the Canon profiles. You will get different results with the Canon Digital Photo Professional (DPP) software. Typically I use Camera Standard or Neutral, depending on the initial results; both of these provide a greater range of contrast, as you can see after changing from Adobe Standard. In this case, Camera Portrait suits this image, and we have to do some adjusting since the shadows are blocked up, meaning a bit darker. Apply your Camera Profile first, and then adjust in the Basic panel for future reference. (16)
The Results
As we tinker around in the newest update to Lightroom, the Canon 5D Mark IV Raw files are finally editable with the same tools as in the previous camera models. With the increase in resolution, dynamic range and low-light sensitivity, we are able to zoom in farther with 1:1 previews and pull more details into the underexposed areas without adding too much noise.
This camera is hard to pass up. It might not be wise to wait on the next improved model. The only feature missing for Adobe is the Canon Dual Pixel adjustment tool, which is found only in Canon DPP software at the moment.
Check out my next articles when this update drops for a rundown of the Canon Dual Pixel tool as well as how other Raw processors compare to Adobe Camera Raw, or ACR.
Want more information on this article? Get access to video content and additional supporting images. Launch the December issue of the magazine by logging in or signing up for a free account by clicking here. Shutter Magazine is the industry’s leading professional photography magazine.