Top 3 Ways To Set Up Lightroom Classic for Faster Editing with Dustin Lucas
One of the biggest complaints I hear from photographers is how Lightroom Classic is slow when they edit tons of images. While there are many reasons why this happens, there is certainly some responsibility on the user. For one, you need to invest in the right tools like your computer and external storage. If you want to know the minimum system requirements, you should definitely check out Adobe’s website for what they recommend. A quick breakdown of what you’ll need is at least a 6-core CPU with a higher GHz speed, 32GB DDR4 Ram or ECC if available, and flash storage. If you are connected to your original files you’ll want the fastest interface available for your system like Thunderbolt 3 or 4 for Mac or USB-C for PC and preferably RAID storage for protection and performance. Keep your catalogs on your local flash storage and always work off external drives for your images.
Beyond hardware, you need to focus on how to manage your software properly, and more importantly, how to run Lightroom catalogs as fast as possible on your machine. Let’s dive into the top three ways to set up Lightroom Classic for Faster Editing. Number one, you need to make sure your preferences and catalog settings are optimal for performance. Number two, you need to understand import settings and the right way for optimal speed. Number three, you need to understand how previews work and prepare them properly. Now that we are ready to dive into the top three ways, let’s dial in your preferences and catalog settings.
1. Dial In Lightroom Preferences
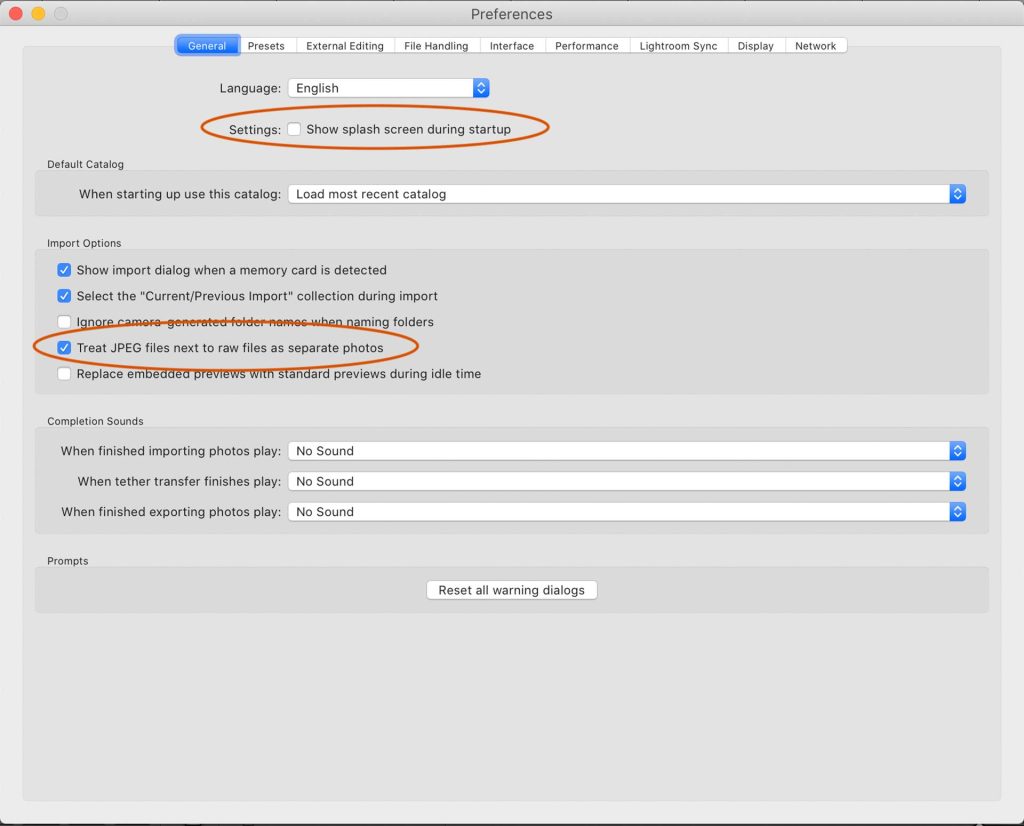
While changing preferences seems like the simplest part of the article, I feel it’s the most overlooked aspect of most photographers’ Lightroom Classic workflow. Not only this but keeping your software updated properly is the only way to success. No one waits to buy new camera gear but they always fall victim to software incompatibility. Starting with Lightroom Preferences in the General tab, you’ll want to uncheck the setting Show splash screen during startup. This is subtle but Lightroom will open a bit faster yet still has the spinning wheel of death while waiting for images to load. Also, you’ll want to select Treat jpegs next to raw as separate photos. This is if another camera shot in jpeg has the same name as your raw files; without this checked they won’t import. Of course, if you shoot raw + jpeg you can leave this unchecked as well.
Moving into the Performance tab you should always turn off graphics processor. It only becomes useful for specific functions and for most of us it just slows down the editing process. I used to set camera raw cache setting to 100GB but found it clogged up my storage so I keep it at 10GB. I honestly haven’t seen any performance loss since I changed, but of course my hard drive stays clean. I check the box Use Smart Previews instead of originals out of habit. The most performance gain is editing on Smart Previews but we will cover that in parts two and three. Let’s jump into Catalog Settings to tweak how Standard Previews are generated.


