Reception Lighting 201 with Michael Anthony
It’s understandable why the majority of lighting questions I get from photographers have to do with receptions. Reception lighting is the bane of existence for many wedding photographers. You are shooting fast-moving subjects in low, unbalanced color light without the ability to control or adjust the subjects for better posing. For most receptions, you can follow a few simple formulas to ensure that lighting is consistent and beautiful. Here are our setups.
A word of caution: If you are not careful, your photos will look like those of an amateur photographer shooting with a cell phone at a nightclub.
Back in 2016, I wrote an article about the basics of lighting receptions. This article takes it a step further and breaks down each individual part with some new knowledge I have gained over the last few years, and takes into account the newer cameras. Let’s start with recommended equipment.
Reception Gear
Cameras
- Canon 5D Mark IV or 1DX Mark II
- Sony A7RIII or A9
- Nikon D5, D800 or D850
Glass
- 135 prime
- 85 prime (for Canon, exclude the 85 1.2; opt instead for the newer 1.4)
- 35 prime
- 24 prime
- 16–35 F/2.8
- 24–70 F/2.8
Lighting
- Profoto A1 (preferred because of its built-in model light)
- Native speedlights are okay
- Westcott Icelight or other constant light source with modifiable color temperature
Modifiers
- MagMod gels, sphere, bounce
- Profoto A1 gels, hood
Reception lighting can be broken down into six main parts:
- Grand entrance
- First dance/parent dances
- Toasts
- Bouquet toss/garter toss
- Cake cutting
- Open dancing
Grand Entrance
During the grand entrance, you are often at the mercy of the flow of events. You may have to photograph the couple weaving through the crowd, and often the bridal party will all take separate paths. Your off-camera lighting has to be set up in a central location where the majority of the bridal party will be congregating, like the dance floor. But that won’t help you during the actual entrance.
A voice-activated light stand (VAL) allows you to use off-camera flash while mobile. My VAL typically stands at a 45-degree angle to our subjects and is stationary near the entrance so we can capture the moment the crowd sees our couple for the first time. Here, it’s important to divide up the responsibilities between first shooter, second shooter and assistant. If you are shooting with a two-person crew, adjust these responsibilities among your team.
Grand Entrance Light Setup: VAL + Bounce Flash
- Primary Shooter: Couple’s entrance, action/reaction, primary angle
- Second Shooter: Bridal party, secondary angle
- Assistant: VAL
- Typical Settings (general guidelines meant to be used as a starting point and adjusted where needed): 1/160th of a second, F/ 2.0-3.5, ISO 1,000, low to mid-power on speedlights
- Lens Choice: 24–70 zoom or 35mm prime
First Dance/Parent Dances
The first dance is a bit of a tough one. If you have not prepared your lights ahead of time, you will be forced to figure out your lighting on the fly, so avoid it if you can.
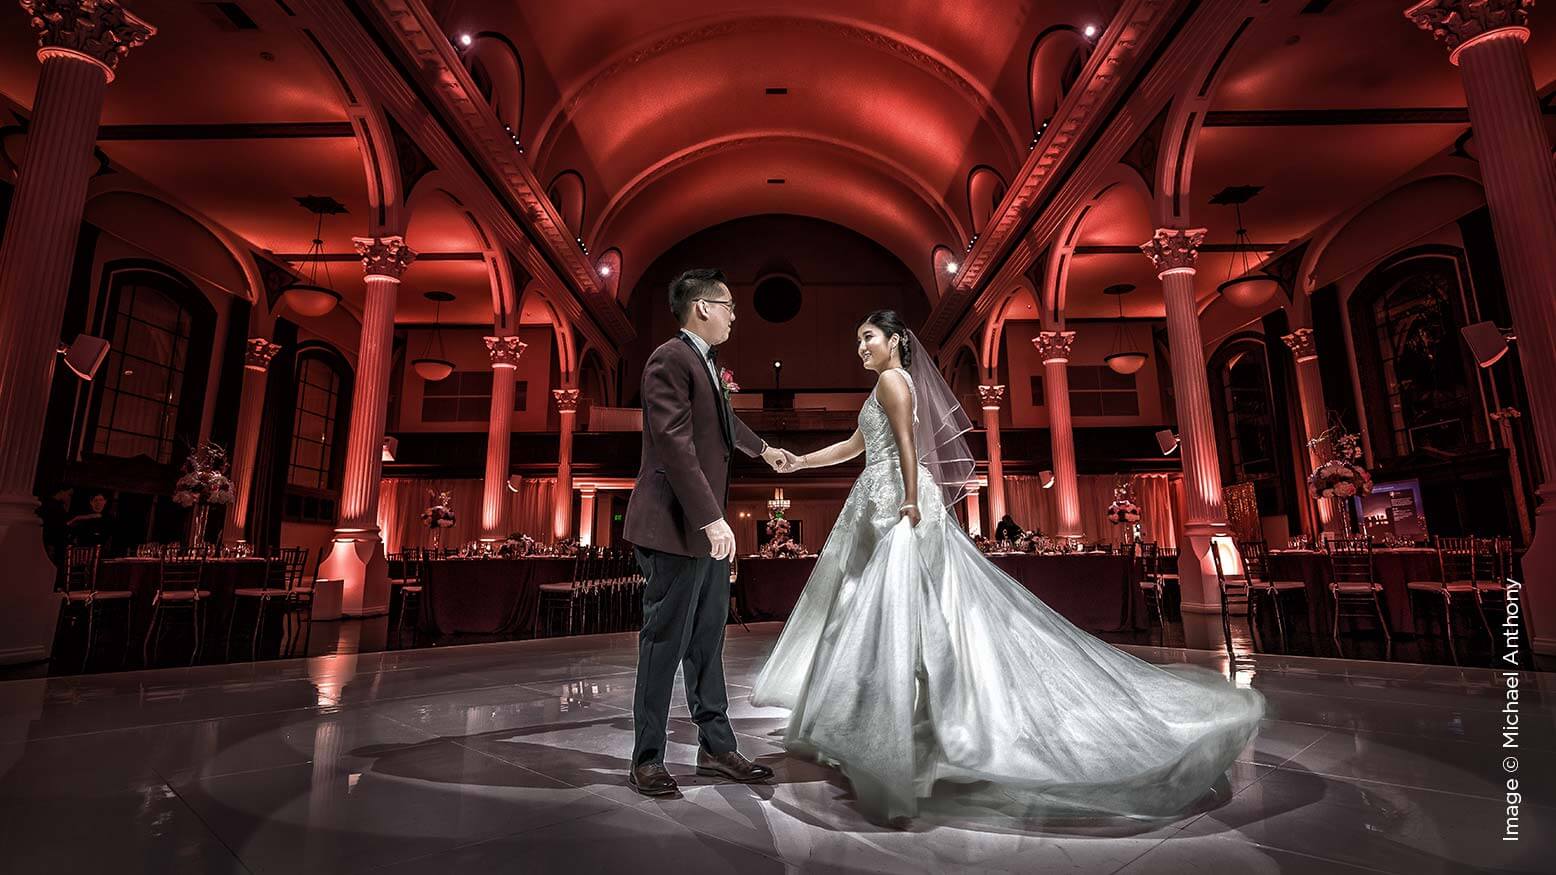
The trick to photographing this is to understand your angles and how they will appear on camera. Let’s take a standard reception hall as an example. Most of the time the dance floor is positioned in the center of the room. Now, if the room is extra large, with equal spacing on all sides of the dance floor, then this process is a bit easier. If your dance floor is closer to the walls on certain sides, then you will want to avoid shooting into the shorter side of the wall as a background. The reason for this is that most of the time there are many distracting elements near the walls, such as doorways, exit signs or the catering staff. In addition, the lighting setups we cover later will cause shadows to fall on these walls, which will wash out any uplighting.
I choose a three- to four-light setup depending on the size of the dance floor. We use two lights on 10-foot stands in opposite corners and one to two additional lights on 10-foot stands in the opposite corners. The lights are placed high to avoid distracting flares and shadows caused later in the night when the dancing begins.
From here, we find the longest distance from our subjects to the background, and use that as our shooting angle. We set up our lights accordingly to make sure we are able to use those angles.
First dances are pretty controlled. There are only two people on the dance floor, so if the couple has not coordinated the first dance, we tell them to start and end their dance in the center of the floor to take best advantage of our lighting position. I do not use on-camera flash because the three- to four-light setup will usually cover all angles. I keep the lights at a 1:2 power ratio (the lights opposite each other have the same power) so we can create both highlight and shadow on our couple to add dimension to our scene.
Choose your angles and have a plan of attack when you approach this part of the day. When using off-camera flash, you have to be aware of timing to get the best shots. For instance, if a couple is constantly turning during their first dance, there will be a point where they line up with your lighting, and ideally you want to shoot at that moment.
Our primary and secondary responsibilities are divided. With different focuses, we are able to capture a complete story. Our primary focuses on creatives, such as wide-angle images, shooting through votives and other elements, and creative framing. Our second shooter focuses on photojournalism, using closer framing that features facial expressions.
- Primary Shooter: Creatives
- Second Shooter: Photojournalism, moment-focused
- Assistant: VAL or third shooter for PJ moments
- Typical Settings: 1/160th of a second, F/2.0–3.5, ISO 400, low to mid-power on lights
- Lens Choice: Primary Shooter: 16–35mm & 85mm, Second Shooter: 35mm & 70–200mm
Toasts
Once we get to this point in the night, we move our lights around for the best possible scenario. Your assistant will come in handy here. Get everyone on your team set up with two-way radios. The planner or emcee will give you a few minutes’ notice to set up, and at that time, you can coordinate where you will have people standing.
Toasts are filled with emotional moments. Moody lighting usually works very well in telling the stories of these events.
We limit this part of the day to two lights, and keep one focused on our bride and groom, seated at the sweetheart table. The other light is on our speaker. The speaker usually stands next to the bride and groom, but if they are talking from the center of the dance floor, then you will just have to adjust your lighting.
Angles are extremely important because we use our foreground elements to help tell the story. If you have an image of a couple laughing in response to a moment from a toast, the best way to give context to that moment is to have the speaker’s hands, notes or microphone in the foreground of that image to tell the viewer what the couple is laughing about. If that is not possible, then you can always use two images on a spread to help tell the story.
Here, we use directional lighting gridded to control light spill. Instruct the speaker to stay put because if you have a person who likes to move around when they talk, you have to adjust your light setup to not be so focused, but you do so at the expense of controlled lighting.
Often the couple’s backs are to the wall and the speaker is to the side of them. If we shoot this from the front, we will have unflattering light on our background and distracting elements will be visible. We choose angles on the sides of the table to avoid bad angles. We have our leads and seconds both focus on different subjects so they can avoid crossing over in front of the couple and being a distraction to the guests.
- Primary Shooter: Speaker
- Second Shooter: Couple
- Assistant: Light management
- Typical Settings: 1/100th of a second, F/ 4–5.6 ISO 400, mid-power on speedlights
- Lens Choice: 85mm, 135mm, 70–200mm
Bouquet/Garter Toss
The bouquet/garter toss is very easy to photograph. You just have to make sure that your system is set up correctly. We put two lights on each side of the bride because her arms will block light on one side when she throws the bouquet over her head. By having flat light here, we can ensure we have no awkward shadows. In addition, we light the group of single ladies with one light from the side.
Our go-to setup is to have the lead photographer directly in front of the bride and our second shooter sitting behind the bride capturing the girls reaching for the bouquet. We used to use multiple speedlights dedicated to both the lead and second photographer for this, but with the Profoto A1’s phenomenal recycle time, we are able to use a single-light setup. We shoot this on medium-speed continuous mode with our lights on half power or less to ensure we have consistent lighting throughout the sequence. Next time you hear “All the Single Ladies” by Beyoncé come on, you will be ready to rock it.
We light the garter removal and toss the same way we do the bouquet toss.
- Primary Shooter: Bride/groom
- Second Shooter: Bridesmaids/groomsmen
- Typical Settings: 1/160th of a second, F/4, ISO 1,600, low to mid-power on speedlights
- Lens Choice: 24 prime or 16–35
Cake Cutting
I prefer constant lighting for the cake cutting. We’ve normally used the Profoto B2 or Icelight, but lately we have been reaching for the Profoto A1. At $1,000 a light, there are less expensive options, but when you are at a point in your career where you value saving space and consolidating equipment, it’s worth it for this part of the day.
You’re going to need to give the couple advice on what to do. We have our process down. The worst thing that can happen is when your clients look at you and ask what they should do in front of all of their guests. Be proactive. Give them instructions on exactly what to do.
We light this from a 45-degree angle, making sure we do not cast a shadow on the bride from the cake. We use a secondary light behind the subjects if there is room, but there’s usually not. Your assistant is crucial in making sure you have a good, solid light setup for capturing this important moment.
- Primary Shooter: Entire scene, PJ moments
- Second Shooter: Tight shots of hands, reactions from guests
- Assistant: VAL
- Typical Settings: 1/125th, F/ 3.5–5.6, ISO 3,200, video light
- Lens Choice: 24–70 zoom or 35mm prime
Open Dancing
During open dancing, all bets are off. Because the dance floor is packed, your off-camera flashes can cause unflattering shadows. We go back to our diamond or triangle of light, but add an on-camera flash that we will ideally bounce off the ceiling. If you are not able to bounce your light, you can also have your assistant shadow you with a light on a pole.
Getting good dance shots requires more than just standing across the room picking off moments with a 70–200. For this sequence, I live on the dance floor. That means I am constantly getting bumped, elbowed, even stepped on to capture fun and exciting moments for our clients.
My rule of thumb is I want to stay at about a handshake’s distance from my subjects to capture the environment and them as they move. If you’re not quick, you will capture some cheesy smiles on the dance floor. The trick to capturing moments is to anticipate them, and then shoot through them as they are happening in real time. Line up your composition using back-button focus and then capture your images without needing to refocus every time.
- Primary Shooter: Couple
- Second Shooter: Guests
- Assistant: VAL
- Typical Settings: 1/200th, F/ 4 – 5.6, ISO 3,200, flashes on low to mid-power
- Lens Choice: 16–35 zoom or 35mm prime
Every wedding will require improvisation on these setups. It’s important to understand your equipment; more importantly, it’s crucial to understand the story you are trying to tell before approaching your next wedding with the tools we have laid out here.
Good luck, and be sure to send me some of the amazing images you created using these setups.

