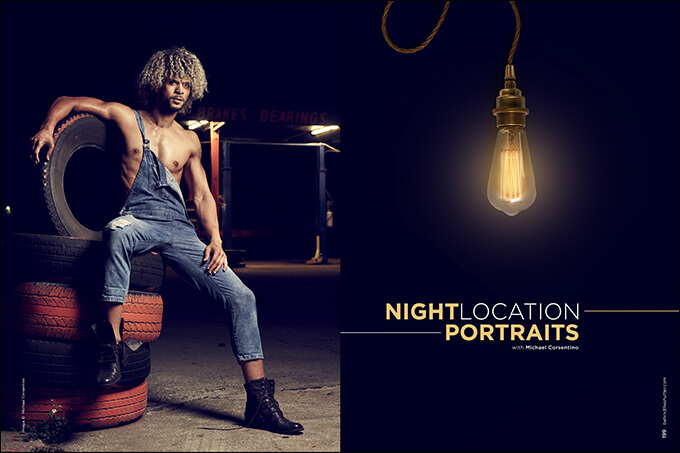
Night Location Portraits with Michael Corsentino
Want more information on this article? Get access to video content and additional supporting images. Launch the February issue of the magazine by logging in or signing up for a free account by clicking here. Shutter Magazine is the industry’s leading professional photography magazine.
I love finding cool locations to shoot in. I’m always driving around scouting, jotting down street addresses, snapping iPhone pics, making mental notes for future shoots. Every town, no matter how large or small, has cool locations. I found the location for this night portrait shoot, a flat-fix garage, by just driving around one night. I’d never seen it at night all lit up by the fluorescent lights above it, and it immediately struck me how cool it looked. The wheels started turning. Along with all the tires, machines and garage grunge, it looked like the prefect location for a night shoot I’d been wanting to do for a while. The next night, I stopped by to take location pics, and sent them to my team along with pictures of the model so we could all start brainstorming wardrobe, props and general look and feel.
When I’m working on location, I like to keep things as simple as possible. For this shoot, that meant using a lightweight two-point light setup. I chose the most portable and easily handheld tools I have in my arsenal: light-duty stands, an extension pole, two Elinchrom Quadra 400WS packs, two companion Elinchrom strobes (these are very lightweight and therefore easily held by assistants), a Skyport HS Wireless Controller and a Sekonic L-478 handheld wireless flash meter.
For light modifiers, I also choose to keep things as light and portable as possible by selecting an Elinchrom 27.5″ Rotalux Deep Octa for my keylight and an Elinchrom 14×35 strip box for use as a possible kicker, accent or fill light if necessary. I love the small Deep Octa. It’s an extremely versatile modifier for its size and weight. It’s able to create looks from hard to moderately soft, and is also compact and easy to travel with. It’s always part of my travel kit.
Less is more with strobe lights on night shoots. Typically, you’ll be working with a high ISO setting and a slow shutter speed to capture the ambient light in the background while illuminating the subject with strobe. It’s a delicate balancing act, the goal being to maintain a moody night feeling by perfectly balancing the amount of ambient light and strobe light. Because the camera sensor’s sensitivity is boosted, you need very little flash power to do the job. (A speedlight would also work really well.)
The low amount of flash power needed has a couple of important technical benefits worth mentioning. First, because you’re not using a lot of power for each pop, you’re asking a lot less from the strobe’s battery. This allows you to shoot considerably more strobed images on a single battery change compared to shooting with your strobe at full or half power. I had my strobe set to the lowest power setting possible, which I believe is 25 watt-seconds for my gear. The second benefit is really fast recycle times. With a low power output, your strobe is ready to go again much more quickly, which means you can work much more quickly.
With respect to balancing ambient and flash, my preferred method is working in manual. TTL works but I prefer the consistency and simplicity manual allows me. My workflow is as follows: First, I establish an exposure for the ambient lighting conditions. To do this, I leave my strobe(s) off and focus solely on creating a good exposure for the background ambient lighting. That means the subject will be in silhouette. That’s all right because once I’ve got the background ambient light exposure dialed in, I turn on my keylight strobe and dial it in to match my ambient settings. How do I that? I use two things to guide me: the aperture setting of my lens and a flash meter. I have to make sure the amount of light being measured from the strobe by the flash meter matches the f-stop on my lens. In other words, if my lens is set to f/5.6, I use a flash meter to measure the light from the strobe until it reads f/5.6. It’s that simple. Using an incident light reading, the meter allows me to measure the amount of light from the strobe falling on the subject and match it to whatever f-stop I need. Of course, you could work intuitively and chimp, but why would you? This method is super quick, and time is money.
Models
I get a lot of questions regarding models, so I think it’s worth touching on briefly. How do you find new models to work with? This is something all photographers grapple with, whether they’re building their book, working on personal projects or testing out new techniques or equipment. I’ve had zero luck with online resources such as Model Mayhem or One Model Place. These services have given me major flake factor. There may be others now that I’m unaware of, but none of them are my go-to sources anymore.
In addition to relying on my modeling agency relationships for access to models to “test” with, I use Facebook, something we all have access to. I post work regularly on regionally oriented Facebook groups serving the photography and modeling communities in my area. Even in Orlando, a relative modeling and fashion backwater, I’ve found some incredible local talent using Facebook groups. In fact, that’s where I found Jai, the model for this shoot. So I feel pretty confident saying that for all but the most rural areas, Facebook is a resource worth looking into.
Want more information on this article? Get access to video content and additional supporting images. Launch the February issue of the magazine by logging in or signing up for a free account by clicking here. Shutter Magazine is the industry’s leading professional photography magazine.