Moody One Light Male Portraits with Michael Corsentino
Want more information on this article? Get access to video content and additional supporting images. Launch the October 2017 issue of the magazine by logging in or signing up for a free account. Shutter Magazine is the industry’s leading professional photography magazine.
It never ceases to amaze me what’s possible with just one light, whether it’s a strobe or constant, plus a little know-how and creativity. A recent assignment I shot for one of Orlando’s top modeling agencies is a perfect example of the magic you can create with one light.
I’d been asked to shoot promotional images of Kino, a newly signed model. The agency wanted dramatic edgy shots that highlighted his chiseled features and ripped physique. It was the perfect assignment for a couple of cool one-light setups.
Working With Modeling Agencies
One of the first things I do when I’m shooting for a modeling agency is ask what they need for that particular model. Does the model have an exciting portfolio? If so, I review it carefully because there’s no use creating something that’s already been done. I find out the creative direction and mood they’re after—edgy, soft, a mixture or anything in between. It’s different for every model, so get a creative brief so you can more easily formulate a plan and avoid any misunderstandings.
I enquire about the model’s experience, strengths and weaknesses so I know what to expect in their ability to move, be evocative on camera and take direction. The more information I have going in, the better equipped I am to produce a series of winning images for the agency.
Conceptualizing the Shoot
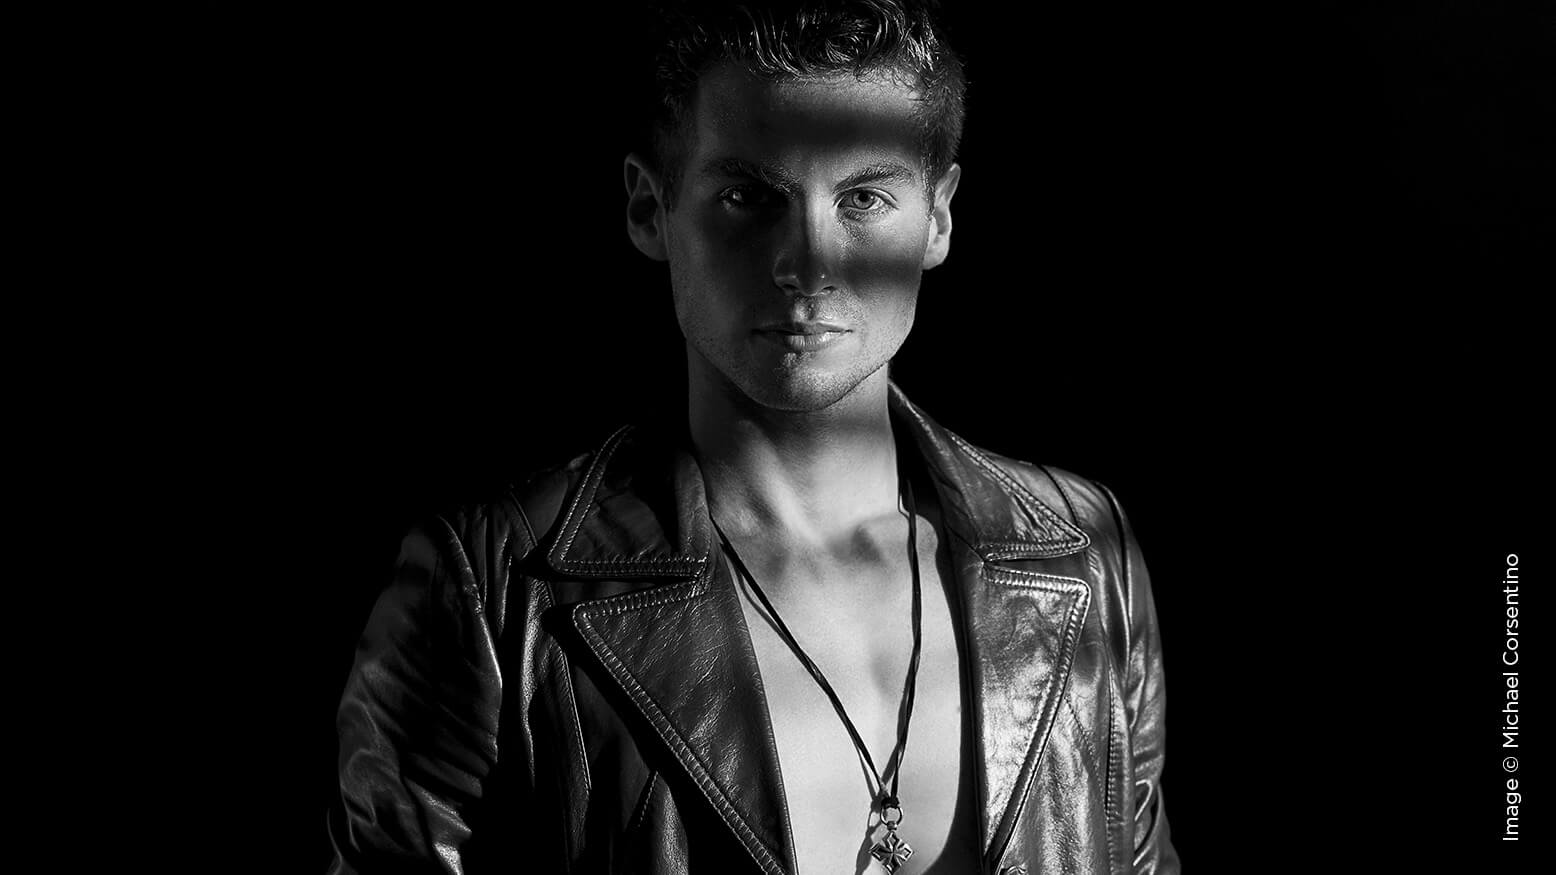
Since the requested direction was dramatic, I chose a black backdrop, retro ’70s styling, an edgy black-and-white conversion and two light sources: a strobe with an octabank to illuminate Kino from above and an LED Fresnel constant light shot through a gobo of louvered blinds to create a dramatic side-lit patterned effect.
Styling Without a Stylist
Model tests don’t normally include a styling budget. At best, there’s a hair and makeup artist, and even that is on a case-by-case basis. Sometimes the models handle those tasks themselves to save money. Absent a professional stylist, the model and I work together to develop a concept. The direction for the styling is also based on input from the modeling agency, which is serving as the client and sometimes creative director.
Alexis, the owner of Modern Muse Models, wanted something cool and edgy for Kino, whom she had just signed. I explained to Kino that my concept for his test shoot was two looks, both retro ’70s inspired, both dramatic, shot on a black background and each with a different edgy lighting style. For wardrobe, I asked Kino if he owned a trench coat, pea coat or leather waist coat. This was a no-go, but he did say he would be happy to pick something up and return it later. This is exactly what a stylist does, FYI. I’d been wanting to shoot a model in a retro brown pleather ’70s waist coat with wide lapels for a while, and asked Kino to see what he could find at vintage clothing stores. This would be the perfect look for what I had in mind, so I had my fingers crossed. Soon Kino sent pictures of the jacket he’d sourced, which was exactly what I had envisioned.
The jacket would be our main attraction, along with accessories I pulled from my own collection—jewelry, sunglasses and hats. It’s always a good idea to have a collection of your own that you can pull from. We ended up using only the jewelry.
Why One Light?
There’s a lot you can do with multiple lights, so why would I use only one light? In nature, you have only one light, the sun. If you’re a lighting geek like me, you’ve been stopped in your tracks by naturally occurring window light, the light from an overhead bulb on a face, a car’s headlights casting a beam of light through a set of blinds. It doesn’t get simpler than one light. The magic lies in what you do with that light. Creating drama with one light lessens the variables, focuses the viewer’s interest and allows you to concentrate on being creative rather than fussing with to much equipment.
Gear
Here’s what I used for the black background on both looks.
- 2 Kupo Master 40″ Riser C-Stands With Sliding Leg (Silver, 10.6′) MFR # KS703512
- 2 Kupo 2-1/2″ Grip Heads With Big Handle (Chrome-Plated Finish) MFR # KG203012
- 2 Kupo 20″ Grip Arms With Big Handle MFR # KG203212
Look #1
Not all light comes from 45 degrees to the side and 45 degrees from above. The sun or an overhead light bulb comes from above, just like the lighting I created for this first look. Top light, or light placed directly above your subject, is the hugely underrated lonely stepchild of lighting patterns. I can’t say enough good things about this simple setup and the results it produces.
A few tips: You’ll want to place your subject just behind the back edge of the octabank to work with the most pleasing part of the light (known as feathered light). Slightly angle the modifier toward the background to create more catchlights in the eyes. Direct the subject to ever so slightly raise the chin to get more light on the face. I love the dramatic shadowed look this lighting technique creates.
Here is a list of the equipment used for Look #1:
- Profoto 7B-1200
- Profoto Head Extension Cable 16′ (5m) MFR # 303518
- Profoto Pro-B Head
- Elinchrom Rotalux Softbox Octa (53″) MFR # EL26184
- Manfrotto 387XBU Black Steel Super Wind-Up Stand – 12′ (3.6m) MFR # 387XBU
- Manfrotto 025BSL Super Boom, Black – 8.8′ (2.7 m) MFR # 025BSL
- Sekonic L-758DR DigitalMaster Flash Meter
The 7B pack required only 50 percent of its power to provide enough light for an f16 stop. This lighting style could just as easily have been accomplished using a 500-watt second mono-block strobe. While I have Profoto 500-watt second mono-blocks in my lighting arsenal, I prefer the Profoto Pro Heads when I’m using a boom arm. Their light weight and compact form factor makes them much easier to counterweight and work with. While not digital, with the power pack situated at the base of the Manfrotto wind-up stand, adjusting the power is as simple as dialing the power knob up or down.
Look #2
For the second look, I chose another simple but effective technique: the use of a focusable constant light and a set of louvered blinds to cast a patterned shadow on the model. This can be any sort of pattern or shape, and is known as a gobo. It goes between the light and subject to create a unique shadowed pattern. I chose the focusable Fresnel over a strobe because it allowed me to control the sharpness of the shadows created by the Fresnel. As this is a much lower-powered source, I needed to boost my ISO to 800, use a shutter speed of 1/125 and open up my lens from f16 with strobe to f5. I used the Fresnel’s focus knob, distance from the blinds and barn doors to fine-tune the lighting effect.
Here’s my equipment list for this look:
- Lupolux DayLED 1000
- 1 Kupo 40″ Riser C-Stand Turtle Base Kit MFR # KS704712 to support the blinds
- 1 Kupo Master 40″ Riser C-Stand With Sliding Leg MFR # KS703512 to support the Lupolux
- Louvered-blinds gobo
- Sekonic L-758DR DigitalMaster Flash Meter
Shooting Editorially
I shoot model tests like any commercial job. I capture an editorial-style mix of images from wide to tight. This gives the agency and the model options for comp cards and promotional materials, and provides potential clients and the agency a look at what I can do with a full-blown editorial. I also end up with enough images for an editorial for my portfolio.
Wrap-up
As you can see, you don’t need complicated setups to produce professional results. Focus on the techniques, not the gear. Use what you have, get creative, have fun and keep pushing the envelope.

