Ready for Getting Started in Underwater Photography? Learn essential tips and gear to begin your fun and challenging underwater photography journey. Here is what I have learned so far.
First, you need an underwater housing for your camera, along with full control over your camera settings from outside the housing. Second, a weighted belt is necessary to help keep you underwater. The camera housing is very buoyant, and without this belt, you’ll struggle to stay steady below the waterline.
With these essentials in mind, you’ll be well-prepared for your underwater photography journey. In the following sections, I’ll delve deeper into the specific gear you’ll need, share additional tips, and go over a recent photoshoot. Let’s get into some important insights on underwater portrait photography.

Equipment Used:
Camera: Canon EOS R5
Lens: Canon RF 15-35mm F2.8 L USM
Light: Natural light
Team:
Photographer: Sal Cincotta
Model: Stanley
What’s up, everyone? My name is Sal Cincotta, and today you’re going to join me on a journey – my journey into underwater portraits. This video is geared toward showing you what you need to get started. I’ve learned it the hard way. I didn’t take a course, and I didn’t watch a bunch of online videos. That might have been my first mistake. But I’m all about that trial-by-fire approach.
So, to frame it up, I’m a native New Yorker. Growing up as a kid in the city, we didn’t have pools. Maybe you had a friend of a friend who had a pool, and they were like the rich people. But most of us kids grew up swimming in a fire hydrant. The fire department would open it, and we’d grab a can or hand. That’s my swimming background: just doggie paddle, that’s all I have. So I don’t really love being in the water, so just keep that in mind as we go through this journey.
So we did this photoshoot with a high school senior and rented the gear. I’ll show you the gear we used for that shoot and some other additional gear we have found to be helpful. The biggest challenge I had was staying underwater. It wasn’t that I couldn’t hold my breath, but I learned the hard way that the camera housing is buoyant, so it just wants to keep rising, which is probably a good thing.
So here’s a breakdown of what I think you need to do underwater portraits of people and the lessons we’ve learned.
What gear do you need to get started with underwater photography?
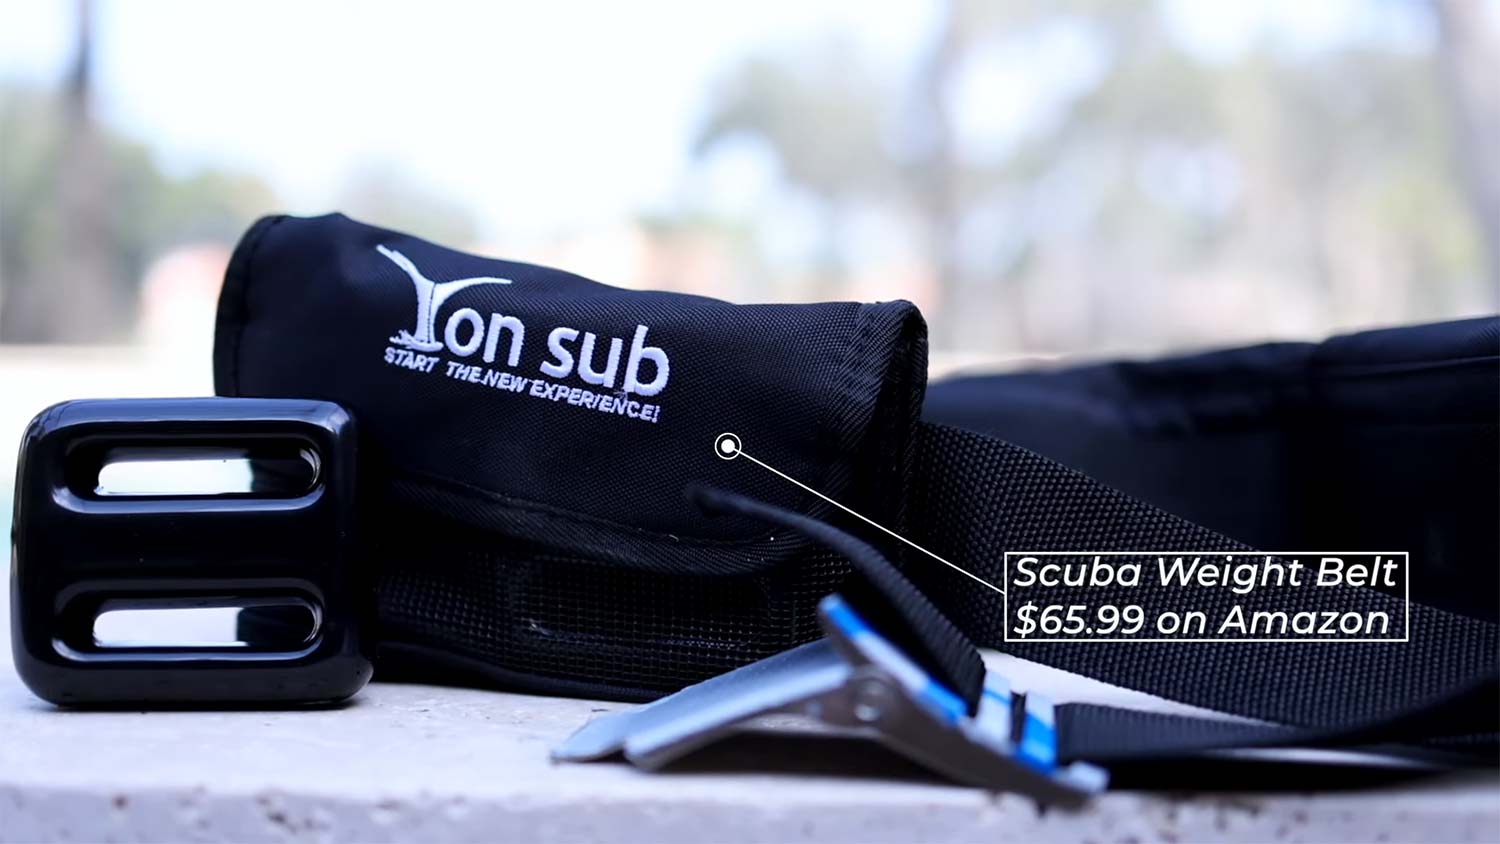
Nose Plugs: 10 Pack of Nose Plugs // Weight Belt: Scuba Weight Belt // Background: Intuition Backgrounds Tar (Fabric) // Fabric Weights: Diving Weights 6lbs // Underwater Camera Housing: Ikelite 200DL Underwater Housing for Canon EOS R5
Keep scrolling to learn more about all this gear and see some images we captured underwater.
Getting Acclimated
The first thing we noticed was that when trying to have a non-swimmer pose underwater, water would rush up their nose anytime we tried to get them into these artistic poses where their head was falling back and things like that. If you think about this from an average client’s perspective, it’s going to take time to get them acclimated to the water. We’ve found that in doing a few of these shoots now, it takes about 20 to 30 minutes for people to get acclimated.

We went out and bought a bunch of nose plugs on Amazon, picked up, what, 20 of them or something like that? Just so we have them for our clients. Since doing this, it has helped our clients not to worry or feel like they are drowning. Or even worse, I have seen people online talk about just blowing water out of their nostrils and snot coming out, and nothing sounds exciting about that, especially for portrait clients. So we went out and picked these up on Amazon, well worth it.
Counteracting Buoyancy
The next thing we figured out was how I was going to stay underwater and counteract the buoyancy of the camera housing. So we went back to Amazon and picked up a weighted belt for about 70 or 80 bucks. This belt comes with weights designed to keep you submerged. I was worried about being too heavy and not being able to surface, imagining myself drowning at the bottom of the pool. Luckily, the belt has a quick-release feature, so if worse comes to worst, you can easily get out of it. That’s how we’re going to counteract the buoyancy.
Managing Pool Backgrounds
One thing I’ve noticed in many underwater portrait sessions is that you’re at the mercy of the pool’s background color. Whether it’s blue, green, or tiled, it doesn’t really evoke fine art portraiture. A common editing technique among photographers is to mask the subject and paint the entire background black. While this creates a cool effect, it lacks depth. When you paint everything black, you lose the glistening crystal quality of the water that sunlight creates. What happens is that you end up with a shot that lacks depth and the romantic quality that you might be aiming for.
When we wanted to change the background of the pool, we headed to Intuition Backgrounds and picked up some fine art black backgrounds made from their fabric material to drape around the pool. You’ll see some B-roll of us setting that up. There are several types of materials: fleece, canvas, fabric, and more. However, we have tested their fabric material, and it won’t bleed into the water, which is important. And as you remove it from the water, you’re not wringing it out like it’s a towel. It actually comes out without picking up any water. We laid them out on the concrete for a few hours in the sun, and they dried completely. We didn’t use these backdrops in the public pool with our high school senior, but they’re a great option if you have your own pool. I’m fortunate to have a pool in my backyard, but public pools work well too.

Using the three backgrounds, we created a U-shape in the corner of the pool. This way, we have some depth, and we don’t lose the marbling effect from the sunlight hitting the water.
Now, the next challenge is that as we place the fabric in the water, it wants to rise. To counteract this, we visited a marine shop and bought six-pound fabric or stick fabric weights, which are stitched in some kind of nylon material. Honestly, I think this is the biggest rip-off on the planet. They’re charging roughly $4 a pound, so this six-pound bag set me back around $25. You know, you spend money in life, and you think, “Man, I just got ripped off.” They gave it to me, no lube. I felt like I got no lube on this. Sorry if that offends you; the price offended me.

I picked up six of these to weigh down the backdrops on the pool floor. We’re in a six-foot deep pool, though you could probably manage with five feet. But that brings us to the next big decision you’ll need to make.
Underwater Photography Camera Housing
There are many different housings on the market, including some cheap plastic ones that might do the job, but nothing works quite like this one from Ikelite. This housing is specifically designed for the R5, and I’ve got a 15-35 lens attached, which is perfect for what I need. What makes this housing so important is that it’s airtight, and all the dials on your camera are easily accessible. I wouldn’t say I learned this the hard way, but I definitely realized how important it is because, while underwater and with the sun setting or moving, I need to change the ISO and aperture. You have to be able to do that on the camera. If it’s in a case, you’re not opening the case every time you change your settings. The buttons and dials really allow for this to be done easily in the pool.

One thing I will tell anyone to note with a DSLR is the electronic viewfinder (EVF). When you put your eye up to it, the screen goes black, and you’re looking through the viewfinder. If the sensor near the EVF detects something close, it switches to the viewfinder instead of the back screen, which makes it challenging when trying to look at the back screen underwater. Fortunately, there’s a setting on almost all of them that allows you to display it on the back screen only, which we’ve set up. This is important because when the housing is in place, it blocks the sensor on the viewfinder, causing it to think your eye is up to it when it’s not. I want to see the back screen, so I can show my client what they look like because that feedback loop is very important.
Practice with Your Client
That leads me to probably the next single most important item you can focus on if you want to get started in underwater portrait photography. Spend at least 15 to 20 minutes outside of the pool practicing with your client. Explain what poses you’re looking for and have them practice because hand placement, leg placement, and arm placement become very important. Yes, you’re going to give them feedback when you’re in the pool and show them what they look like on the camera, but what I have found over the few sessions we’ve done so far is that by having a goal and objective outside the pool, you’re helping them get a feel for their body. Once you’re underwater, you lose that sense of what you’re doing; what you think you’re doing and what you’re really doing are two completely different things. So at least start working on that mindset with your client, and that’ll make the in-pool part much smoother.
Underwater High School Senior Photoshoot
We had a photoshoot with a high school senior while I was learning these lessons and figuring out what gear I would need for underwater portrait photography. He’s a swimmer and they wanted some underwater portraits. I thought, well, I’m game! If you’re game, just be patient with me. And boy, did I learn a lot.
During our shoot with the high school senior, we were in a public pool. Obviously, we would never use backdrops in that setting, but we paid a fee to shoot in the pool, and they let us use one lane to get pictures there.
We’re not using strobes; I know they have underwater lighting and things like that. I’ve been experimenting with different options, and I really like the way natural sunlight coming into the pool looks. We’ve also shot on overcast days, and the pool looks completely different. You can go either way. Maybe in a future video, we’ll explore triggering light outside the pool to fire into it.
Final Images
Settings: f/8 @ 1/1600, ISO 1600

Settings: f/4 @ 1/4000, ISO 800

Settings: f/4 @ 1/5000, ISO 800

Settings: f/8 @ 1/1600, ISO 1600

Settings: f/8 @ 1/640, ISO 1600
How much does it cost to get started with underwater photography?
We’ll be creating future videos where we show you in-water sessions, including portraits for high school seniors, boudoir, and fine art photography. Our ultimate goal is to offer something that nobody else is doing for their clients, or that only a few photographers are doing, mainly due to the complexity involved.
To give you some perspective, the underwater housing costs around $1,600 to $2,000. You need to be sure you’re ready for this investment. Initially, I wasn’t sure, so I rented it the first time, which cost almost $400 per rental. After renting it twice, I’ve already spent $800, so we’ve decided it’s worth investing in and purchasing it because we genuinely enjoy the process. It’s going to be a lot of fun.
One more statement about the gear. I’m using the R5 with a 15-35mm lens. What if I wanted to use a 70-200mm lens for some reason (not for underwater portraits, but hypothetically), I would need a new set of adapters to be able to fit that lens. Keep in mind these additional fees before you think about getting into underwater photography. I would highly recommend you rent it the first time or borrow someone’s first before you get going to make sure you love it.
Hopefully, this helps you if you’re thinking about getting involved in underwater portrait photography. Wish me luck on our future shoots. I think you’ll love the videos we’re going to show on the channel, along with the results. We’ll see you in the next video. Join our mailing list to get notified when the next video is released!
Disclaimer: The information provided in this blog post is for general informational purposes only. Underwater photography can involve various risks, and it is important to prioritize your safety and the safety of others. Different environments, such as pools, open water, and scuba diving conditions, present unique challenges and risks. Pool photography usually offers controlled conditions, while open water introduces factors like currents, visibility, and wildlife. Scuba diving photography involves greater depths and requires specialized skills and equipment. Always use appropriate equipment, stay within your skill level, and be aware of your surroundings while in or near the water. The author and publisher of this post are not liable for any injuries, accidents, or damages that may result from the use or misuse of the information provided. Please take all necessary precautions and use your best judgment when practicing underwater photography.