Turning the Ordinary Into Extraordinary: Creativity with Constant Lights with Michael Anthony
Lighting comes in many shapes and sizes. Over the next few months, I am going to be writing about the advantages of different kinds of lighting and modifiers, and how to best use them. Today, I want to talk about my favorite way to light dark environments and add some flavor to normal photographs: constant lights.
I absolutely love constant lights because they are quick and easy, and allow you to see exactly where you are putting your light. They are simple to adjust, can be very compact and are great when you are blending them with the ambient light in a scene.
Good lighting doesn’t always mean expensive. These recommendations are aimed mainly at wedding and portrait photographers who need compact lights for location shoots.
Compact Constant Light: Yongnuo YN-300 II
Yongnuo makes very good lighting equipment at an incredible price point. I started using these flashes years ago before Canon introduced radio-controlled flash. I was always amazed by their quality, so I knew that their video lights would be no exception. The lights are compact and bright, and come with built-in barn doors to control direction. I have used other daylight-balanced lights, but because of the low price, small size and awesome battery life, this is my favorite daylight-balanced light. We have multiple YN-300’s in our studio.
Warm Constant Light: Profoto B2 or Lowel ID-Light
The built-in modeling lamp on the Profoto B2 is LED-based and will give you 90 minutes at full power. The light accepts all Profoto modifiers, and, because it is both a strobe and a constant light, it is a great option for a traveling photographer. I often use this light to illuminate backgrounds or to light my couples in dark environments. It’s a great hair light for standard indoor portraits as well. It’s a bit pricey. A less expensive alternative is the Lowel ID-Light, which is incredibly bright, dimmable and has really beautiful color.
Large Constant Light: Westcott Ice Light
The Ice Light is a larger unit that’s touted as a portable “window light.” It can be quite soft when placed close to a subject. Westcott just produced a second version featuring a removable battery and 50 percent more power. I use this light less than the two above, but it is a good tool for very specific circumstances, specifically head and shoulder photos. It works great outdoors or in open shade to add some quick direction to light. Westcott claims nearly perfect color from this daylight-balanced light, which I believe after my experiences with it. This option is more pricey than the Yongnuo, at almost eight times the cost, but there are competitors coming into the market.
Getting Creative With Constant Light
You don’t always need to create constant light. It’s often already available. One of my favorite ways to add a little bit of spice to a normal image is to light up a background. As a wedding photographer, most of the rooms our couples get ready in are filled with lamps. Take a look at the image here.
I was using the window light to illuminate my subject here. The background was uninteresting, so I removed the lampshade and placed the bare bulb close to the wall directly behind my subject. I flipped on the light and switched the white balance on my camera to cloudy. Now my subject had perfect warm skin tones from the window, and the background was lighted with a really beautiful orange from the lamp. This was a quick way to make a normal photograph interesting.
Using Available Constant Light
When shooting this ring shot, I wanted to illuminate the ring with a very hard, very small light source. I had purchased this set of battery-powered string lights from Amazon for $8 a color to use as backgrounds for detail shots and foregrounds for portraits. I placed them behind a glass bottle to give the background an abstract pattern of light. This gave a really nice bokeh to our background.
To light the ring, I needed a light source that was hard and small, and could be controlled relatively easily. Thankfully, I always have my iPhone handy, and the flashlight was a perfect solution to light this ring. The flashlight can be easily maneuvered to put the light exactly where it’s needed. Just keep in mind that the flashlight on the iPhone is not color balanced, and correction will be needed in post.
I love using constant light in dark environments. The reason is that you are able to see exactly where your light will be falling, along with how it affects the overall contrast of the image. At this wedding venue, the lights were dim during the reception, and the couple had a long string of votives and other candles on a semi-reflective table. I wanted to make it look like the couple was being lit by candlelight, but there were not enough candles on the table, and the light fall-off caused the couple to be underexposed and the candles to be overexposed. This was the perfect scenario for a video light.
By placing the light directly behind the votives, we were able to add a strong directional light source to the image, illuminating the faces of the bride and groom. By hiding the light within the composition, the light seemed to be coming from the candles. Placing the bride and groom into a romantic pose allowed us to further enhance the ambiance of the room, as well as the connection between them. This is a great example of a type of image I would use to either open or close a wedding album.
Finding Extraordinary in the Seemingly Ordinary
When you are in a dark environment, look for light patterns being created in your natural environment. In a dark room, chandeliers can be a great source for a beautiful background. During this wedding, I saw a pattern on the wall from the light coming through the chandelier glass.
The pattern being created on the wall was casting a gorgeous orange pattern on the wall, complementing the colors in this Indian wedding, and I wanted to use it to create a beautiful image. I used the barn doors to shape a video light from the upper corner of the image into a beam that came down onto the couple. I turned her body away from the light and brought her face back into it, allowing her to be lit on the short side of her face, which is always flattering for a female subject.
You can create your own light patterns using glass and a constant light. If you find a semi-translucent pattern, you can actually shine a light through it onto a background just like you see occurring naturally in the image above. It’s a great way to make an image more interesting.
This second image was taken of the same bride on the next day of her wedding inside her dark hotel. I placed a video light close to her face to give us soft shadows. I wanted to create texture in her makeup and her beautiful jewelry. By positioning the light off to the side, we were able to accentuate the gorgeous details of her attire. The amazing thing about constant lighting is that you are able to see the shot before you even take it.
Some of my favorite available-light sources are bus stops and illuminated panels, like those in movie theaters. This image was shot using the latter. Because the image panels are large and the subject is placed very close, you get very soft shadows and a reflective surface. Always look for natural light sources when it’s dark outside.
Blending Constant Light With Flash
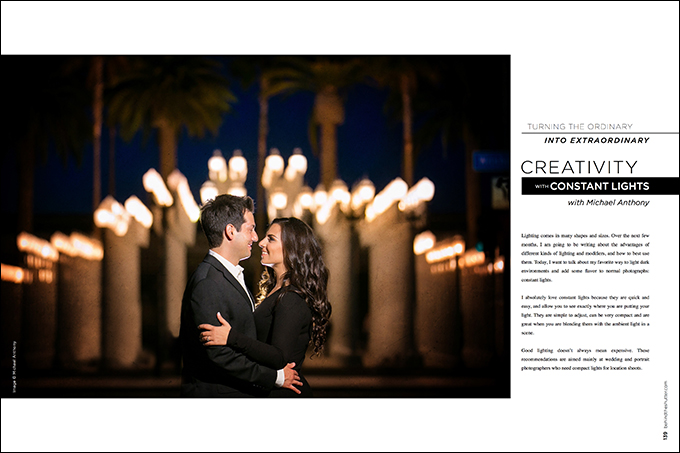
You can use constant lighting alongside flash for a gorgeous result. I often do this when shooting a couple outside after a wedding. We typically use an incandescent constant light source as our keylight, and a bare-bulb flash as a backlight. I wrote a bit about blending different color-balanced lights in my August article, and this is one of the ways that we do just that. By being able to see the light spill from the keylight, we are able to quickly get the shots we need when it matters. This image was photographed at a popular location in Los Angeles using that exact technique.
No matter how you choose to light your subjects, the principles of lighting will always stay the same. While we photograph in a way that is interesting to us, ultimately what drives us to continue to create is what types of images our clients are buying. Images with impact sell the most. Photography is a win-win if you adopt this mindset, because the more you continue to step outside the box, the more happy clients you will have.
For your next five shoots, use available or constant light in a way that is different than you normally would. Use shadows, geometrical lines and composition to create something truly unique to you.
There are no magic tricks to using light, but if you can change the way you see light on a daily basis, it will impact your imagery forever.

