
Turning the Ordinary into Extraordinary: Creative Color Balance using Gels with Michael Anthony
Color balance can be a thorn in any photographer’s side. When you are first learning about light, there are so many variables in regards to the shape and exposure of a light source. Having to learn about the color of a light source can be overwhelming.
Learning about color balance is necessary for any wedding photographer because we often encounter venues with ambient lighting that differs from the color of our flash. This is referred to as “corrective color balancing,” a topic that deserves an article in itself. Today I am going to show you how to use creative color balancing to make amazing and one-of-a-kind portraits for your clients.
In order to understand how to use color balance creatively, you need to understand very basic color theory. So take a look at the common color wheel, that thing we’ve been looking at since we were in elementary school. The color wheel shows primary colors and their complements. Together, a primary color and its complements form a triad, found in a triangular pattern on the color wheel. Take a look at the wheel below to see what I mean. Note where orange and blue fall on the wheel, as they will be essential to understanding the magic of color shifting.
Making Magic Happen With Color Shifting
I first stumbled across color shifting on my very first bridal shoot. From day one as a portfolio-building wedding photographer, I was using color shifting to create images that have a fairytale look.
When I stumbled across this technique, it was entirely by accident (an accident that I contribute to helping launch our business, as you will see in a second). I was using a CTO gel on a flash in the evening when I began my shoot, experimenting as a strobe newbie to create sunlight. I had forgotten to change the white balance on my camera from the night before when I was shooting in a tungsten environment. This resulted in a scene that turned the ambient light blue, with my flash providing the clean daylight color on my subject. Looking through the back of my camera, I came across something that was very different than what I have seen in other photographers’ portfolios, which meant it would be easily remembered by my potential clients. I went on with the shoot, with a plan to experiment with this technique when I got home.
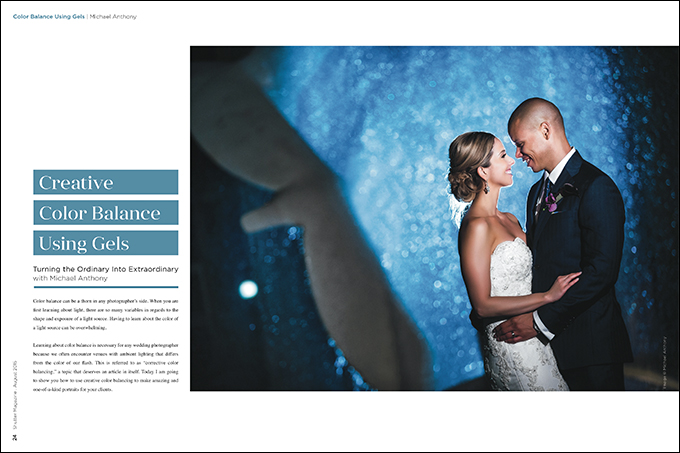
The next day, I created this image (Fig. ?) during a stylized bridal session I was shooting to build portfolio work. It ended up becoming an iconic image that helped launch our new business.
This is a very popular venue in the Los Angeles area, and I cannot count how many weddings we have booked as a result of a bride finding this image in a Google search. When brides search for wedding photos from this venue, this image looks so different from anything else that they cannot help but stop and stare at it. Brides who connect with our style are sold after seeing this single photo because it showcases their wedding venue in a way that no other photographer has. By shifting color to blue in camera by setting our camera’s white balance to tungsten, and then adding a strong backlight without a CTO gel (to add more blue to the ambient light), I was able to create an image that looked straight out of a fairytale.
Choosing Your Equipment
As with most things in photography, your equipment will help you accomplish a task more efficiently, as long as you know how to use it. When you are choosing a modification system for your lights, you need to consider things like speed, reliability and ease of use. We use two lighting systems in our studio: Canon 600EX-RT’s and the Profoto off-camera flash system. Both of these serve different purposes that meet all of the above considerations.
For our speedlights, we are huge fans of the MagMod system. MagMod has made gelling flashes extremely easy, and has added amazing tools like their grids, which offer amazing control of light spill. There has never been another system that allows for easier creative color effects in a speedlight system. I’ve captured amazing photographs using this system. Trust me: Owning two for your speedlights will improve the quality of your flash photography as long as you know how to use them.
Here is an example of the stackable MagMod system on our speedlights:
For our Profoto lights, we have cut custom gels to fit over the flash heads. These can be attached in between the frosted glass disc and the metal prongs that hold the disc in place. We do it this way rather than use a dedicated gel holder because it allows us to attach modifiers to the Profoto head, which has always been a challenge when using gels on our flash. This is what our solution looks like (note that this technique for attaching gels to your light is not endorsed by Profoto; you are assuming all responsibility for your equipment by doing it):
Color Method 1: Shifting Ambient Color Blue
Color shifting is a technique by which you shift the color of the ambient light in a scene, and balance the light on your subject with a corrective flash gel, such as a CTO (color temperature orange) or CTB (color temperature blue). There are primarily two ways to shift color. There’s the easy way, which is to shift your ambient light blue by setting your camera’s white balance to tungsten (3200K) and balancing the light on your subject with a CTO gel.
Shifting ambient light blue usually looks good when you are trying to emulate or emphasize an image taken at nighttime. There is a bit of a surreal look to this technique that is unique and different. I highly recommend using this technique at dusk, which occurs just after the “golden hour” when the sky is its bluest. The French call this time of day l’heure bleue, or the “blue hour.” You can imagine the gorgeous effects you can get when making already blue ambient light even bluer.
Now that you have your subject balanced and your ambient light the correct color, let’s add some additional light sources to make an awesome photograph look extraordinary. By adding additional nongelled flash sources, you are emphasizing and adding to the blue ambient light. I often use an ungelled light as a backlight when I am shifting color because it gives a very fashionable look that is consistent with our studio’s style.
Now, go a step further and place your light behind a water source such as a fountain, and see the cool effects you can get. Take a look at this example where we did just that:
Color Method 2: Shifting Color Orange
The second way, shifting your ambient light to a warmer tone, can be a bit harder. This is best done when trying to emulate or emphasize sunlight. I have found that the best way is to use a single or double CTB gel, depending on how orange you want your ambient light. When you use a double blue gel, however, you will not be able to simply adjust your white balance in camera to get perfect color like you can with a standard one-gel color shift. Nor will you be able to do it in post-production, since many Raw converters are limited in the maximum color temperature that they can produce, meaning that the color will just not come out right. In order to get perfect color when shifting ambient light orange, you have to use a gray card to obtain a custom white balance.
Let’s break down the basic steps to getting this awesome look.
Step 1: Set up your light sources and composition for your photograph.
Step 2: Gel your flashes. You can use one or two gels. MagMod’s speedlight modification system makes it easy to use multiple gels. Keep in mind that you will lose some power when shooting through a gel, usually about a stop, depending on the color.
Step 3: Obtain a custom white balance of your gelled flash by using a gray card. (Canon users should take a properly exposed photograph with the gray card. Fill the frame and lighting with your gelled light. Navigate to White Balance > Custom, select the image you took and press Set. Consult your owner’s manual for more detailed instructions on obtaining a custom white balance.)
Once you have completed these steps, you are ready to get going. When you shoot, your flash should be putting out perfectly balanced light, while your ambient light is a very warm orange tone. Remember, these are creative effects, so use them with intent, or it could look fake. For instance, if I am creating sun flare using flash (as I wrote about in June), shifting color to orange would be completely appropriate. Also, going back to our color wheel, if I have a model dressed in a beautiful blue gown, shifting ambient light to the perfect complementary color of orange would be totally appropriate creatively.
To help you visualize the effects you can get from color shifting, here are three examples of an image where we used color shifting from blue to orange, with a middle daylight balanced image in between:
Understanding Color Theory
Let’s go back to the color wheel. Sir Isaac Newton invented the first known color wheel in 1706 by arranging colors in a progression on a circular rotating disc. He found that if he spun the disc quickly, the colors would blend together and disappear. There’s science behind choosing colors for your photographs.
By using colors on the wheel that are opposite each other, we are creating an image that is visually pleasing to the eye. These are referred to as complementary colors, which always look good together. (Notice how orange and blue are opposite each other; try experimenting with multiple sheets of CTO or CTB gels when color shifting to get amazing results.)
Choose a color on a color wheel, and then draw a triangular pattern from the head. The two opposite colors you land on complement the main color you chose. These are referred to as triad colors. You can use all three of these colors together, but even using two of them will usually produce a visually pleasing result.
Color shifting has been an essential part of our studio’s style. While the technique behind these images is simple, it is not often done, allowing us to make our clients wonder how we were able to create an image that looks so different from anything they have seen at the same venue.
This look’s aesthetic is not desired by every bride or portrait client, but I highly recommend you distinguish your work from your competition by creating images that are distinct and unforgettable. Before you press the shutter button, ask yourself if the shot is something the majority of photographers could accomplish in the same place.
If your answer is yes, then you need to do more to distinguish your shot.
Look for creative ways to set yourself apart from other photographers using the techniques brought to you each month in the pages of Shutter Magazine. Trust your instincts and your unique way of seeing the world, and I promise your ideal clients will search for you.


This Post Has One Comment
The photos never show up on these articles. Any way to fix this?