Bringing Client Concepts to Life with Michael Corsentino
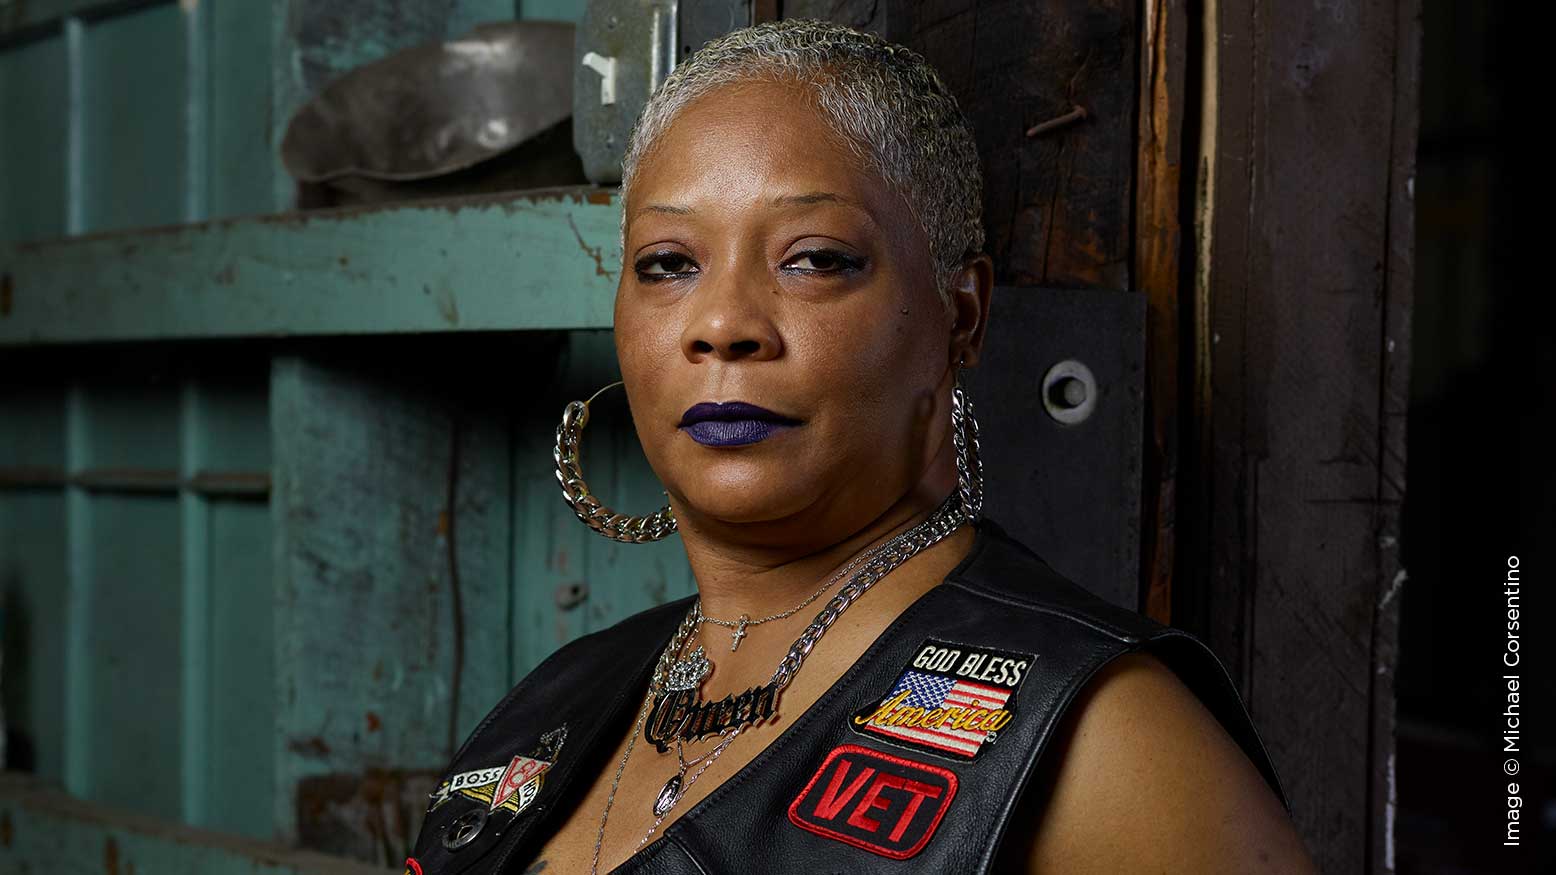
As professional photographers we’re often called upon to wear several hats: photographer, location scout, wardrobe consultant, art director, grip, etc. Such was the case with the portrait featured in this month’s article. Angela hired me to shoot a portrait she planned on gifting to her husband. She planned to wear a leather motorcycle vest which had significant sentimental value to her husband and she wanted something that said “badass.” That was the entire client brief! Badass is right inside my wheelhouse so I was excited to create something cool for her. The location and art direction were left up to me. This is actually a bonus as I have more control of the entire look of the portrait I’ll be creating. I had several locations in mind. On a lark I reached out to a local welding shop I’ve worked with assuming it was a long shot at best. I asked if we could shoot there and… they agreed! A lesson relearned that it never hurts to ask. I knew with all the machinery, metal, and the shop environment, this would be the ideal location for an edgy, badass portrait. It actually ended up exceeding my expectations as I was able to catch the owner welding in the background of the top selection from the session.
Shooting professional models is a relative cake walk. They know how to move, they subsist on a steady diet of cotton balls and Diet Coke, and they have no problem preforming on demand in front of the camera. I’m kidding about the cotton balls and Diet Coke! My point is that with real people, aka non-models, you have subjects with real curves and real bodies. Treating those curves and bodies with the respect they deserve is the key to creating successful images that clients will love.
With real-world subjects, lighting and posing become even more critical. There are ways to flatter the figure with both of these elements. Knowing when and how to plug these techniques in is the key to creating optimal results. When it comes to flattering curvy bodies, nothing beats “short lighting” as it creates a thinning appearance for the figure. Short light, which I used for this portrait, is really simple. The term “short light” is used to describe a light’s position – in this case, a strobe – relative to the subject and camera. With short light, the illuminating for the subject comes to the side of the face and figure facing away from the camera. In this lighting pattern the shadowed side of the face and figure are positioned toward the camera as you can see here. I’m hardly a posing expert, but I can tell you that shooting a heavier-set subject from the side of their body rather than from the front also goes a long way toward flattering their figure and face. I’ve done both of these things for this portrait. Using these two techniques will get you far when shooting curvy subjects.
After getting the key light dialed in with both its position and exposure, I added a second light to the mix to serve as an accent for the key light. This second strobe was positioned opposite the key light in what’s commonly referred to as a cross light arrangement. This lighting pattern creates a more sculptural, dimensional look than one light used alone. Reference the before and after accent light images to see the difference. I prefer to work one light at time, adding additional lights only as needed. Woking this way keeps things simple, uncomplicated, lets me focus on the photography, and it’s a less-is-more approach that works for me. Once both lights were balanced appropriately it was easy to move the entire two-light setup around as needed to capture the subject using different angles and areas of the welding shop.
The accent was modified very simply with a sheet of tough spun diffusion paper taped in front of the strobe’s standard small reflector. Smaller reflectors create a more specular, contrasty light and the tough spun helped knock down the exposure. Without it, it was too bright even at the strobe’s lowest power setting. 2 Elinchrom ELB 500 packs and their compatible heads provided the illumination for this shoot. For the key light I choose my go-to location lighting modifier, the Elinchrom 27.5 Deep Octa. It’s easy to travel with, sets up in seconds, and it’s a versatile all-around tool. I used it fully diffused with both internal and external diffusion fabrics in place in order to strike the perfect balance between soft and specular light. The key light and modifier were supported hand-held by the subject’s friend using an extendable paint pole with a Kacey paint pole adapter. I prefer the ELB packs and heads for location work. At just under 5 pounds, they’re super easy for assistants to use hand-held without fatiguing. I also brought along a pack of colored gels in case I wanted to throw in an additional background strobe with red or blue light. I ended up not feeling that was necessary but its always smart give yourself options.
All in all the shoot came together really well and my client couldn’t be happier. Bringing your client’s concepts to life doesn’t have to be complicated or onerous. The key is good communication, a clear idea of what you’re trying to accomplish going in, and a simple, effective lighting plan. My advice is always to keep it uncomplicated and creative. Keep your eyes and ears open and always think about what you’re not seeing. The final you’re seeing here isn’t where I started out during this shoot. It’s easy to miss something potentially great when you’re in the shooting bubble. In my experience, the strongest image may not be the one you’re shooting but something still unseen and undiscovered. Stop, look around, reframe. You’ll be surprised at the hidden gems just waiting for you!

