6 Lighting Tips for Bodyscapes with Matt Meiers
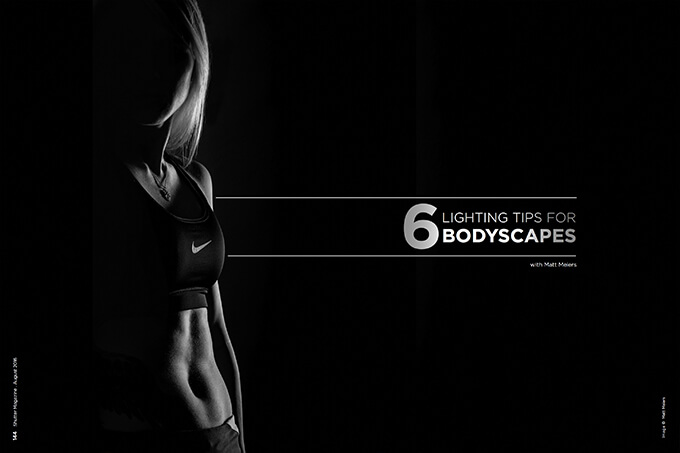
Bodyscapes are the perfect addition to boudoir and fitness photography. Some potential clients may hesitate at first, and understandably so. Posing for photos that reveal so much of themselves can be quite unnerving.
“I was a little worried that all the insecurities I have about my body would stand out in pictures,” clients have said.
Then, when their curiosity takes over, they just can’t get over that feeling of, “What if I posed for photos like that? How good could I look?”
Now that the thought has been planted, let’s get you started. Lighting bodyscape photography can be very simple. Having said that, it can also be quite frustrating, since just the slightest movement of your light, subject or camera can make a world of difference.
Some of these tips may also apply to fitness photography and other genres, but for now, I’ll stick with bodyscapes.
1. Have a plan.
It goes without saying you should start with a plan. What are your client’s goals? What do you want your final image to look like?
- Silhouette?
- Just a hint of light grazing across a shoulder or collarbone?
- Dramatic hard light accentuating unique facial features?
- Maybe some nice light brushing gently across your subject’s torso or lower back?
- Do you want the light hard or soft?
You may not want to use the same light and modifiers to make her collarbones pop as you would to show the smooth curves of thighs, hips and waist. One of the great things about shooting bodyscapes is once you get it right in camera, there’s not much editing to be done in post-production. Depending on the type of photos you’re going to be taking, you may not even need to have hair and makeup done.
2. Background.
If you’re going for impact, a black background is best. If you have access to a black backdrop, use it. If you don’t, shoot toward the open side of the room and raise your shutter speed to knock down the ambient light. Just remember that if you are using a flash, don’t go higher than your camera’s sync speed, or you will get that nasty black bar across your photo.
3. Grids, barn doors and flags, oh my.
Controlling the light is a very important aspect of bodyscapes. I use a combination of grids, barn doors, flags and whatever else it takes. If you’re not shooting full-length body photos, a smaller stripbox will work fine. Most of the photos in this article were shot with a Paul C. Buff Einstein with an 8×36-inch softbox, along with an egg-crate grid. There is no reason you can’t use natural light, or even a ringlight, for bodyscapes. If you don’t have strobes or access to a window, you should be able to find a speedlight, trigger, small white umbrella and stand for a little over $100.
4. Move your camera. Move your lights. Move your subject.
If you’re not getting the results you want, don’t give up and move to an entirely new pose and lighting setup. Move one of these three things: light, camera or subject. Don’t move all three at once. The slightest adjustment can cause very dramatic changes.
First, move the camera. It’s the easiest of the three to move, and you’ll see new results the quickest. It may be best to start off on a tripod so there’s no guesswork about where you were when you shot that last frame, and you won’t need to reposition yourself because your tripod is already there.
If you’re not getting the shadows exactly where you want them, feather your light in one direction, then the opposite. Now move your light up, then down. Use your modeling light when you’re shooting with strobes if you can.
5. Experiment.
I love to experiment. One of the best opportunities to do so is at ShutterFest. If you have never been, you owe it to yourself to change that. The number of people willing to pose for the camera, both models and photographers, never ceases to amaze me. There are people all over the place sharing ideas, time and even equipment. With a plethora of wardrobe options and people willing to assist you, it just cannot be beat.
- Practice.Don’t have a model? That’s okay. Just use a mannequin, a peach or nectarine. Yes, fruit. You mean you never noticed how much a peach looks like a derriere?We photographers have dream jobs. There aren’t many people circling the sun right this second who can make the impact we do with our clients. So, if you’ve never tried bodyscapes, I challenge you to start now.
One memorable bodyscape client wrote this of her experience with me: “Then he showed me one where I felt like I looked phenomenal. I’m not an overly emotional person, but I just started crying because for the first time, I felt like I had long, thin legs and a trim, sexy body. I felt pretty. I felt sexy. I’m crying again as I write this because I’m truly overwhelmed by how amazing this whole experience has made me feel.”
But I think I got more out of that session than my client.


