5 Ways to Use a Strip Box with Amber Jones
I love my strip boxes. My go-to’s are the Profoto D2 line and the Profoto 1×6 RFI strip boxes with grids. You can use them to create gorgeous directional light that focuses on drama. And who doesn’t enjoy an excellent dramatic photograph?
I use these light modifiers for my maternity, fitness and boudoir clients, because of the control and impact they have when shaping light.
Tips for Photographing Bodies
- Drinking lots of water gives the skin a supple and pleasant glow.
- Use loose clothing to avoid impression lines from underwear, socks, bras, pants, etc.
- Coconut oil or baby oil (unscented) will give the skin a subtle glow.
- To create a workout/sweat look, rub oil onto the skin and then spray water over it for a beaded effect.
- Don’t be a creep—this goes for both male and female photographers. You are photographing people in a vulnerable state, either fully nude or partially clothed. No one wants to feel objectified or uncomfortable.
My typical camera settings used: between f/9 and f/14, ISO 100, with shutter speed 1/160. The light is typically at 3/4 power.
Camera used: Sony a9
Lenses used: Sony 85mm 1.8 (the majority of the time) and Sony Zeiss 35mm 1.4
A tip for beginners—using the modeling light on your flash unit will help you to see the direction of the light.
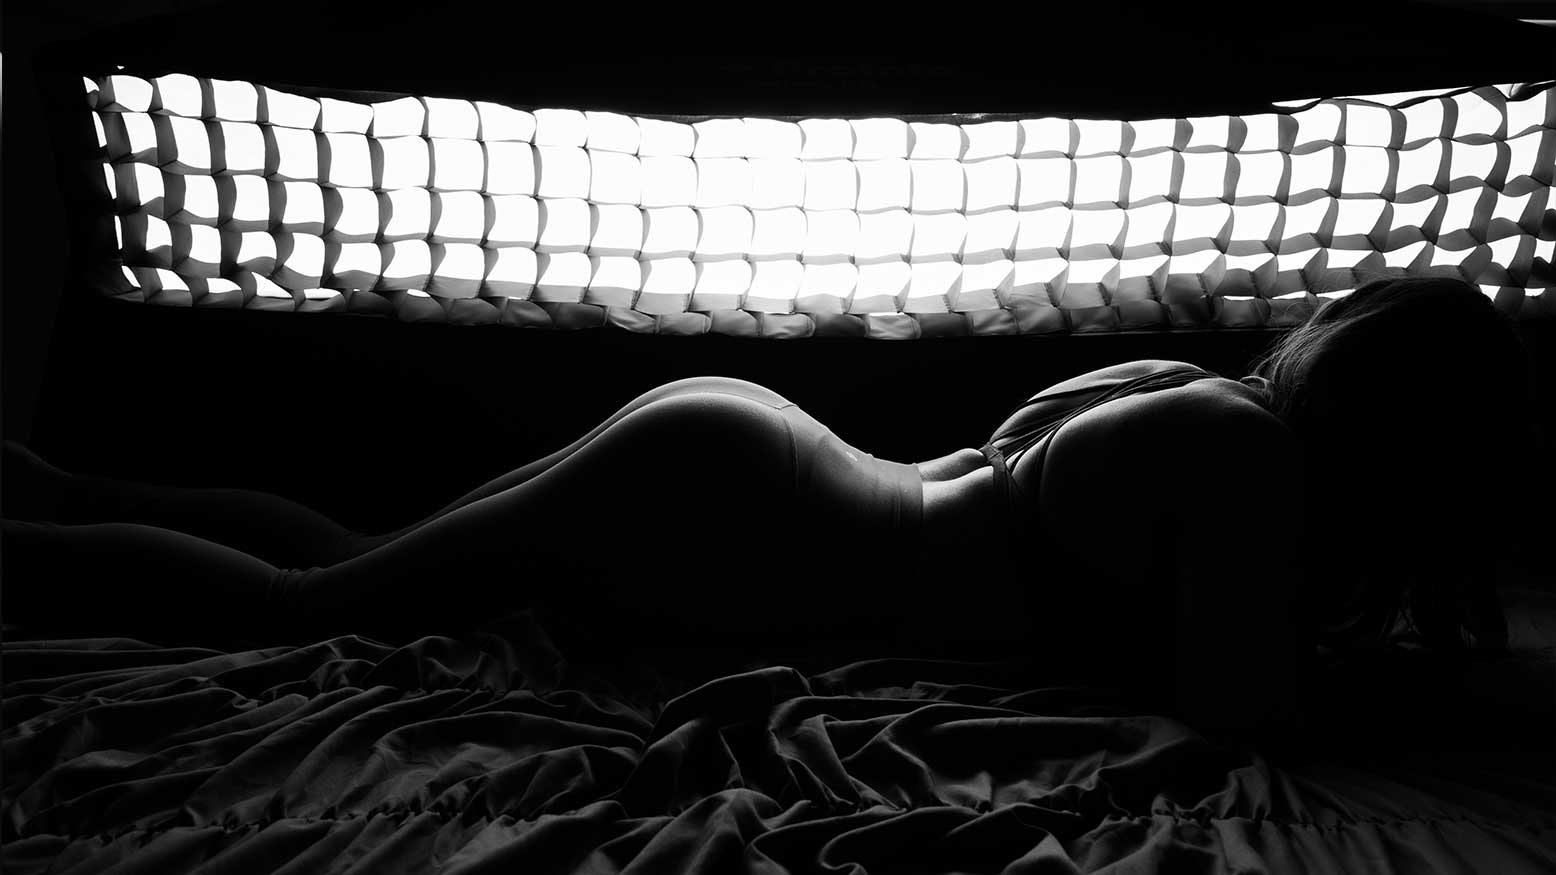
1. Bodyscape (1 light)
The classic, sexy, appealing bodyscape—my clients come to me for these photographs because they are alluring and sensual without being overtly sexual.
For this set, you will need a bed or table for your client to lie on. I always have them start lying on their stomach, with their hair pulled forward and off their back. They need to lie as close to the edge of the bed as possible, so the light is only a hand’s width away from them.
I put the light a few inches above their bum and angled slightly down, so I have room to photoshop out the soft box in post.
I use a regular light stand, putting a black board or popup background in front of the stand to create a pure black background.
Then, I ask the subject to move their shoulder blades to create beautiful shadows as well as to push their bum in the air and tip it toward the camera.
My trainer always tells me, when I am working my shoulders, to bring my shoulder blades together in the back like I am going to pinch a pencil between them. Giving your client prompts like this helps them visualize what you want them to do.
After I photograph their back, I ask them to turn over (I turn around to give them privacy). Then, I ask them to bend the knee that is closest to me to keep the nether region a bit more private.
For ladies who prefer not to have their nipples showing, I ask them to place their hands on their chest, with their nipples touching their wrists. Placing their wrists over their chest gives them privacy and still allows them to get those gorgeous ab shots.
An excellent prompt for when you are photographing the abdomen is asking them to take a deep breath in or asking them to pull their tummy in and up (this brings out the ribs and creates beautiful shadows).
Do a full shot from mid-thigh to neck, then do detail shots of the abs, arms, chest, collarbone, neck and face.
2. The Mirror (1 light)
Using a mirror in the background is about adding dimension. By creating a reflection, you are adding more interest to the photograph as well.
Place the light behind and slightly to the side of the subject to skim the light across their body. Have them push their booty back and turn it toward you, so you see a highlight on both sides of the butt cheek. Ask them to put their weight on the leg closest to the camera, and it will make their bum appear larger. Then have them switch the weight. Also, have them tip their chin to the ceiling to get their hair to look longer.
3. Standing (1 light)
The idea here is the same as with the mirror, but now we are only focusing on the subject. Photograph their side, back, stomach, chest, collarbone and shoulders. Have them face you and then away from you. Ask them to change their position to give you different shapes.
This method is great for clients who:
- are pregnant and want to do a fine art nude (pregnant bellies look best when Mom is standing).
- want to show off their long, gorgeous hair
- are looking for fitness shots
- are looking for boudoir shots
4. Standing (2 lights )
Let’s call this one variety.
Here are some combinations you can create with two gridded strip boxes:
- A light on either side of your subject, lit from the back at a 45-degree angle to the client
- One light angled at your client from the front and one from behind.
5. Standing (2 lights, version #2)
set the other strip box behind and angled at 45 degrees toward them to recreate a rim light.
I didn’t provide light diagrams, because so much about style is tweaking the light to what you specifically love. Don’t limit yourself to two strip boxes either. An octa, a sizeable soft box, or a large umbrella for fill with two strip boxes can all look amazing.
You can use smaller strip boxes, but you will get much more light fall off, and it may not give you the same feeling when using them with a standing subject.
Put these techniques into action, and you will add variety to your work and create beautiful, timeless art for your clients. Since adding the bodyscapes to my business, my sales have increased by 35 percent, with more and more clients now buying wall art.


