5 Tips for Shooting the Milky Way with Rey Benasfre
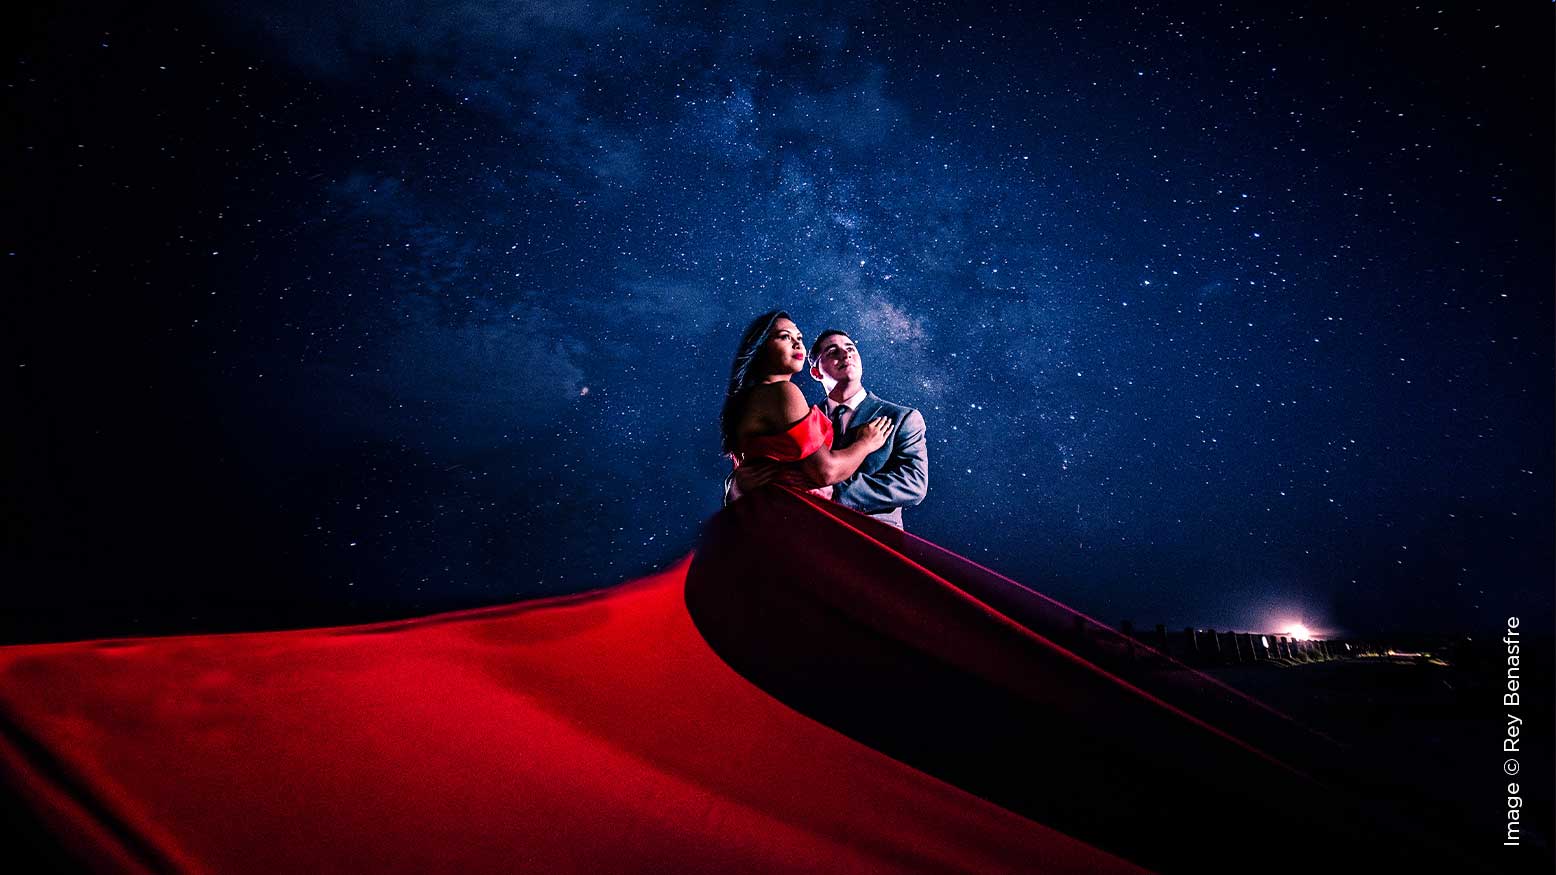
Before I got into the professional world of portrait and wedding photography, I began with photographing landscapes and sunsets. It wasn’t long before I was curious about capturing nightscapes. I would go out at night and photograph the city lights, traffic lights, and then the stars. What I really wanted to know was how to photograph the Milky Way galaxy. Photographing the Milky Way was something that took careful planning and execution. After my first successful attempt, I was addicted and began hunting the Milky Way every chance I could over the next three years. Along the way I had made mistakes, refined my techniques, and had a few close calls. In this article I’m going to share 5 helpful tips to consider before you go on your hunt for the Milky Way.
1. Gear
Gear isn’t as important as you might think. What matters more is your imagination and planning. Sure, the better your camera’s low-light performance is, the better quality your images can be; but with minimal gear and following a few basic principles I’ll explain in this article, you’ll be capturing beautiful night sky images that will wow your friends and social media followers. At the bare minimum you will need the following:
DSLR/Mirrorless camera
As long as you are able to manually control your camera’s exposure settings (aperture, shutter speed, ISO, and white balance) you will be able to capture the stars. Even some of the modern point and shoot cameras on the market today are capable of shooting astrophotography.
Lens
You can use any lens, but if the goal is to get the night sky and as much of the Milky Way as possible, you will want a wide angle lens. If you’re limited to using a 50mm portrait lens, you can still capture the stars, however, that is all that you will capture in frame. If you want to produce amazing images of the big night sky with interesting landscape elements, a wide angle lens between 12–24mm is the best choice. Next, the wider the lens’ aperture the better. With a wide aperture around f/1.8–f/3.5 you will be able to keep the best shutter speed and ISO settings.
Tripod
You will be taking long exposure shots with 15–30-second shutter speeds. You are going to need something to keep your camera completely still as the shutter is open in order to prevent motion blur. Price ranges and quality vary with this stuff. A great quality tripod is highly recommended, but if we’re being minimalists, you really just need something that can handle the weight of your camera and lens while keeping it steady. I’ve taken some amazing Milky Way images with a $30 mini tripod.
Headlamp/Flashlight
This is more of a safety tool for you and your gear. Most of the time you will be working in complete darkness. I’ve fallen into ditches, twisted my ankle, and knocked over a tripod with an expensive camera and lens attached. Common sense would definitely say to bring a flashlight, but I highly recommend a headlamp so that you have your hands free to work and carry equipment.
2. Planning
So you have everything on the list, bought a new $2,000 wide angle lens, and that awesome astrophotographer you follow on Instagram responded to your DM and told you what his settings were on his last post. You head out in the middle of December and hope to capture the Milky Way. Then when you get there you can’t find the Milky Way anywhere and your images look like they were shot in the middle of the day. What happened? Like I said, having the most expensive camera gear is not important. What’s more important is a good imagination and proper planning.
When and Where
A few things you need to consider when planning your session is the time of year, location, and moon phase. Depending on where the Earth is on its orbit around the sun, the Milky Way’s galactic core is only visible at certain times in the year depending on what hemisphere you live on. For most of us living in the northern hemisphere, the Milky Way usually comes out between March and October. Over the course of the season, the times and position of the Milky Way will change. I suggest planning and tracking this on apps like The Photographer’s Ephemeris or Photo Pills. These apps can show you on a map the exact time and direction the galactic core will be visible.
Next, you need to make sure that you’re shooting in a location as far away from light pollution as possible. Even the lights produced from a small town in middle America will be enough to drown out light from the stars. Have you ever gone camping and noticed how the sky looks so amazing at night? That’s because the further away you get from populated areas, the more stars are visible in the night sky. In some places you will be able to see the Milky Way itself with the naked eye.
Finally, you need to pay attention to the moon phase and cloud coverage. While it’s tough to plan for cloud coverage in advance, you can always count on the moon phases to be accurate. A full moon is like a giant reflector of sunlight which will drown out most of the stars and provide light to the entire landscape. Keeping the shutter open will amplify this light enough to look like sunlight in your exposure. Just like in the hypothetical scenario I described earlier, this will cause your night images to look like they were taken during the day. Plan on going out during a new moon or crescent phase where the moon is either not visible or producing minimal light to interfere with your exposure. Personally, I like going out during a crescent phase just to get a little bit of moonlight to provide interesting shadows and dimension to my landscape elements.
3. Safety
The number one priority for any shoot should always be safety. Safety risks drastically increase when you are in the wilderness in the middle of the night. Other than flashlights, other things to consider when planning are the location, wildlife, terrain, and people. You want to make sure that the place you are going to is safe and that you aren’t trespassing on private land. Also keep in mind the wildlife that can be lurking around at night. As soon as I moved to North Carolina, I went out into the middle of the wilderness at 3 a.m. While shooting I heard something big rustling in the bushes but didn’t think much of it. I found out later from locals that the land was home to many black bears. Pay attention to the terrain as well. If possible, visit the site during the day or check on Google Street View so that you can identify anything hazardous such as holes, cliffs, sharp rocks and anything else that can hurt you if you don’t see it. Lastly, we have people. I usually lone-wolf it, but I always prefer to have safety in numbers. Not only is it more fun to share the adventure with someone, you never know who or what you might encounter out there in the dark.
4. Settings
Now the question that everyone wants to ask first: What settings do you use? After you have your idea, your plan, and you are at your beautiful location, it’s time to start setting up your shot.
For these types of shots you are going to need to crank up all of your “exposure triangle” elements to get as much light as possible onto your camera’s sensor without too much noise or star trailing.
Shutter Speed
Starting with your shutter speed, the longer your shutter is open the better, so that your camera is picking up as much light information as possible. It will pick up light from stars you didn’t even know were there! The only thing that limits our shutter speed is the Earth’s rotation which causes the stars to move across the sky. Star movement creates motion blur and what astrophotographers refer to as “star trails.” The shutter speed that you use will depend on the focal length of your lens. The best way to use your focal length to determine the ideal shutter speed is the “500 rule.” It’s a simple formula where you divide 500 by the actual focal length of the lens. If you were shooting with a crop sensor camera then your formula would look like this:
exposure time = 500 ÷ (crop-factor × focal length)
27.7 seconds = 500 ÷ (1.5 crop x 12mm)
So with a 12mm wide angle lens on a Sony A6300 I can shoot anywhere between a 25–30-second shutter speed depending on my aperture and ISO settings.
This is another reason why smaller focal lengths are ideal in astrophotography. The shorter the length, the longer you can keep that shutter open.
Aperture and ISO
Next, you want to keep your aperture as wide as possible. This will allow you to shoot at lower ISOs, which is our last ingredient. Because aperture and shutter speed are limited, we will need to turn our ISO up until we get the exposure we want. This can also be limited based on how much noise (grain) your camera model produces and how much of that noise you want in your images. The higher the ISO, the brighter the Milky Way, and the more noise you’ll see. Like I mentioned earlier, this is why you want to shoot with the widest aperture in order to minimize the level of ISO you need. Fortunately, the majority of newer camera bodies are able to handle high ISOs around 3200, which is usually a great place to set it. Just be aware that no matter what there will always be a little noise and you can get rid of it in post.
Personally, I like to fine-tune my ISO by starting high (6400) and lowering it through several test shots until I get one that works. You’ll eventually get to a point where you already know what to set your camera at. Trial and error!
5. Focus
Now that you know how to get the proper exposure, the last thing you need to do is get proper focus. This seems to be a greater challenge for most beginners. It’s tough for our lenses to autofocus when it is completely dark. While there are many advanced techniques to do this for better results, there is one technique I do to keep it simple.
First, you want to switch to manual focus mode then set the focus ring to infinity. This will focus your lens to its farthest point. Be aware that it won’t be 100% perfect so you will need to fine-tune it. Most modern cameras will allow you to switch to live view and magnify the view on your LCD. Read your manual to see how to do this on your camera model. Once you have your focus point magnified, point the camera toward the brightest star in the sky until you can see that star on your screen. Then manually focus your lens until the star is at its sharpest.
Conclusion
So that’s it—all of the basic things you need to know to take pictures of the Milky Way. There are a lot more advanced techniques that will produce greater results, but everything I’ve explained here will get you off to a great start. I’ve seen photographers with the most expensive equipment take Milky Way images that were “meh” and others with starter cameras create mind-blowing images. The key takeaway here is that your imagination and planning will produce better images than advanced techniques and expensive gear. Keep it simple. Stick to the basics and plan your shots.


