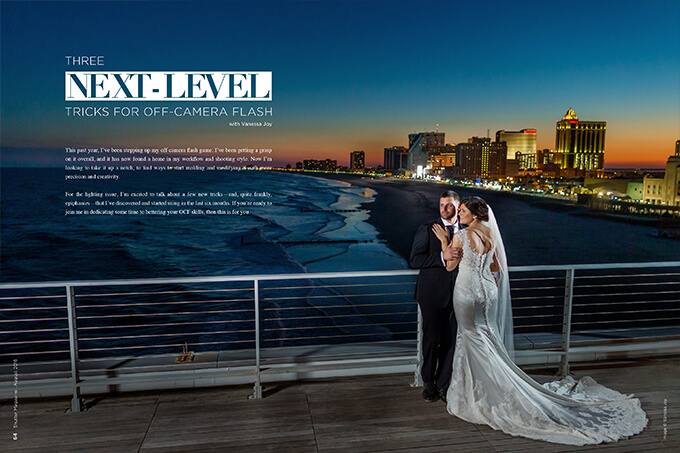
3 Next-Level Tricks for Off-Camera Flash with Vanessa Joy
This past year, I’ve been stepping up my off-camera flash game. I’ve been getting a grasp on it overall, and it has now found a home in my workflow and shooting style. Now I’m looking to take it up a notch, to find ways to start molding and modifying it with more precision and creativity.
For the lighting issue, I’m excited to talk about a few new tricks—and, quite frankly, epiphanies—that I’ve discovered and started using in the last six months. If you’re ready to join me in dedicating some time to bettering your OCF skills, then this is for you.
One-Light Magic
I like using just one light. Not because I don’t want to work with a five-light setup so every picture is perfect, but because I want to be mobile and have an easy and fast setup. Wedding photographers don’t always get a ton of time to set up, if any at all, and the last thing I want is my bride and groom standing around while I futz with lights.
When I use one light, I put it in one of two positions around my clients—in front or behind them. This part isn’t rocket science, but let’s chat about it anyway.
I put the light in front of my clients when I want to fill in shadows cast by the sun. Could I use it for other things? Sure. But my clients want that light and airy feel that my brand portrays, so my goal is to give that to them under any circumstances.
These images were taken on a cloudy day, and, as much as we like to say that means we’re shooting under a big softbox, that’s exactly the problem. We’re shooting directly under a huge softbox. When light is directly overhead, even when it’s diffused, it casts shadows under eyes, just like what was going on for this wedding day. So, I just plopped my Profoto B1 on a stand and used it to fill in the shadows.
When my clients look at my photos, they don’t understand why they get a warm fuzzy feeling. They shouldn’t understand it. But they should know that they can expect that from me even if the sun isn’t shining on their wedding day or engagement session.
For this shot, I used a Profoto B2, held by my assistant to camera right behind the brush. Why behind the brush? Because that’s where the sun typically would have been shining through. This helped create that warm glow that this overcast day in the forest simply didn’t provide naturally. I used a CTO gel on the light as well (more on colored gels next).
Color Me Pretty
One of the next-level steps you can take is to add color. You can do this to color-correct or color-enhance.
Take this photo below. I put on a CTO gel (fancy talk for medium orange) on their faces because I wanted to cool down the image overall so the building lights wouldn’t appear drastically orange and the night sky would become more blue since we were past twilight. This is a good example of using a gel to color-correct.
Now, the technique I mentioned above can go terribly wrong if you overcompensate for the color. I did this in the photo below by mistakenly putting the dark blue gel on my light instead of the lighter blue. There was no Lightrooming/Photoshopping that was going to help me there. Learn from mistakes!
Additionally, you can make use of all the other gels in that pretty little gel pack and create any color light you’d like. I don’t normally do this for weddings, but for fashion and portraits, it’s quite fun. It can easily enhance otherwise dull backgrounds and create a fun rimlight around your subjects as well.
Control Your Light
I’ve been working on controlling the light with my OCF. If you look back at my night pictures from two years ago and even last year, you’ll see a lot of light spill, particularly on the ground. I’d try to darken it in post, but that doesn’t always work so well without some serious Photoshopping. Truth is, unless it’s intentional, it’s a good indicator that you haven’t mastered light control yet (still guilty!). Someone told me once that you should never reveal your light source when shooting natural light or otherwise. I think that rule applies here.
The easiest thing to do is get a grid and start playing around. They make different grid degrees so you can determine exactly how narrow of a beam of light you’d like for the given situation. The best way to learn this is to just pop a grid on in a dark area, turn on the modeling light on your strobe and see the light change as you switch grids. When you use this with actual subjects, use the modeling light, especially if your subjects move. This way, you can always tell if they’re in the beam of light you’re creating.
This photo is an example of grid use on the backlight that is behind them camera left. I wanted the light to just kiss them so the image kept its nighttime ambiance and wasn’t flooded with light or light flare. To light their faces, I had the Profoto portable beauty dish with the diffuser attachment to soften things up.
Now that I’ve inspired you to try a few new things—which usually means buying a few new toys—I’ll take it one step further and show you how to put them together in the video. When I first get my toys, I sit there staring at them blankly before attempting to figure them out without directions. Allow me to save you a few minutes of your precious time so you can get shooting right away.