
10 Tips for Creating Eye-Catching Social Media Videos with Andy Strong
We’ve all been there, scrolling aimlessly on our phone, floating in a sea of emojis and LOLs. We may not even realize we’re doing it, but suddenly 10 minutes (or two hours) pass, and we’ve watched 10 two-minute episodes of something called “Parkour Cats From Outer Space” and found ourselves ordering some swag from their website. What is going on here? How does one begin to make an impact in this sea of endless distraction?
This is an ever-evolving science, but there are some methods to the madness of keeping people’s attention.
It’s hip to be square. Search for “square video performance,” and you’ll get a plethora of research showing that square videos outperform landscape videos. More screen space, more engagement, more time spent watching, more purchasing. They are a native fit for popular social media platforms, but how do we get square?
If square video is your only deliverable, you can start by creating a square using Sequence settings in Adobe Premiere. Simply change the frame size from 1920×1080 to 1080×1080, and voilà! Your video is now square. A great place to start.
If you need both 16:9 and square, edit the 16:9 first, and then make a copy and change settings to square. Make necessary adjustments to the video using Effects > Motion > Position/Scale in Adobe Premiere to keep your subject in the new framing.
A/B Test: Add text to the top and bottom of your 16:9 video to make it a square. Create a buzz-worthy headline and place it meme-style on the top and bottom of the video in black bars. Use sequence settings 1920×1920 to match the long edge of your video and add your text. I prefer the interface in Photoshop for editing text; you can also use the built-in tool Legacy Text in Premiere.
Bonus Tip: Keep it local. 9:16 is standard for Snapchat users, and Square is currently native to Instagram and Facebook. Who knows what interesting new dimensions will be trending in the future?
Make motion your best friend. Use the position and scale tools to keep your video in constant motion. To keep up with the overstimulated mind, try creating movement even if your original shot was static. It can be as little as a 5% increase in size, but the more movement in your video, the more likely your audience’s brain will stay engaged. Again, you’ll use Effects > Motion > Position & Effects > Motion > Scale to make your adjustments. There are plenty of ways to overdo it—season to taste.
Find your rhythm. Use varying speeds to stimulate the brain. Use Command + R to bring up the clip speed/duration window. Juxtapose slow-motion video (50% speed shot at 60fps) with sped-up footage at 150 to 200% speed, and take your audience on a rhythm ride. Continue with a roller coaster of quick cuts to keep the brain engaged, and then hit another slo-mo beauty shot. Watch your video with the sound off and clap each time your shots change. Does it create a compelling rhythm? Does clapping at each cut give you a better understanding of the pacing of the video? Are there any moments that could use a slower or faster cut?
Double the fun. Get footage from multiple angles and distances, and, if possible, use an additional camera to grab video simultaneously. You can always do a second take from an alt angle to create a similar effect. Make the same moment more interesting by cutting between your shots. Put one camera on a steady medium shot on your subject, place the second camera at an angle and grab closeups of hand gestures or a profile for an angle/distance double whammy.
Short video, short shots. Again, keep the story moving. If a shot is up for three to five seconds without a change, social media users have ample opportunity to keep scrolling. Create a five-second montage of half-second shots or a slideshow of still images that blasts through at five to 10 or more shots per second for three to five seconds. A time-lapse is a great way to use fast-paced still images to move your narrative forward. Be careful not to overdo it: Too much too quickly can confuse rather than entice. Alternatively…
Be a one-shot wonder. There are two sides to every coin, and if strobe-light-like editing isn’t your style, a steady moving shot is a great alternative. If you have access to a steadicam or Movi, choreographing a single shot that moves around an interesting space and follows your speaker can be a great way to keep your audience’s attention. A steady single shot builds tension, and when done well, can create magical “how’d they do that?” moments. If you are going this route, have your choreography worked out in advance. It’s recommended for experienced teams with plenty of time to rehearse and try multiple takes.
Use your words. A staggering number of videos are watched without sound. To get your message across, appeal to the parts of the brain that are activated by decoding language. Reading increases attention spans and can also help us remember more than spoken words alone. Use this to your advantage and add text to your video.
Moving text in five steps. To have each word pop up as it is spoken:
- Use Premiere’s Legacy Text to type out your text.
- Make adjustments to font size and use the Transform > Height & Width tools to fill the screen with text. You can change fonts individually as well.
- Drag your text into your sequence.
- Make a copy of your text in a new layer by holding the Alt key as you drag to a new layer. Make a new layer for each line of text.
- Use the Crop tool in Effects > Video Effects > Transform > Crop so the spoken word matches up with written text. Remember, one line of text per layer makes this possible. Crop out lower layers first using “bottom” crop and then adjust “right” crop to make words appear. You will need to add keyframes at the beginning and ending of each spoken word to animate your reveal.
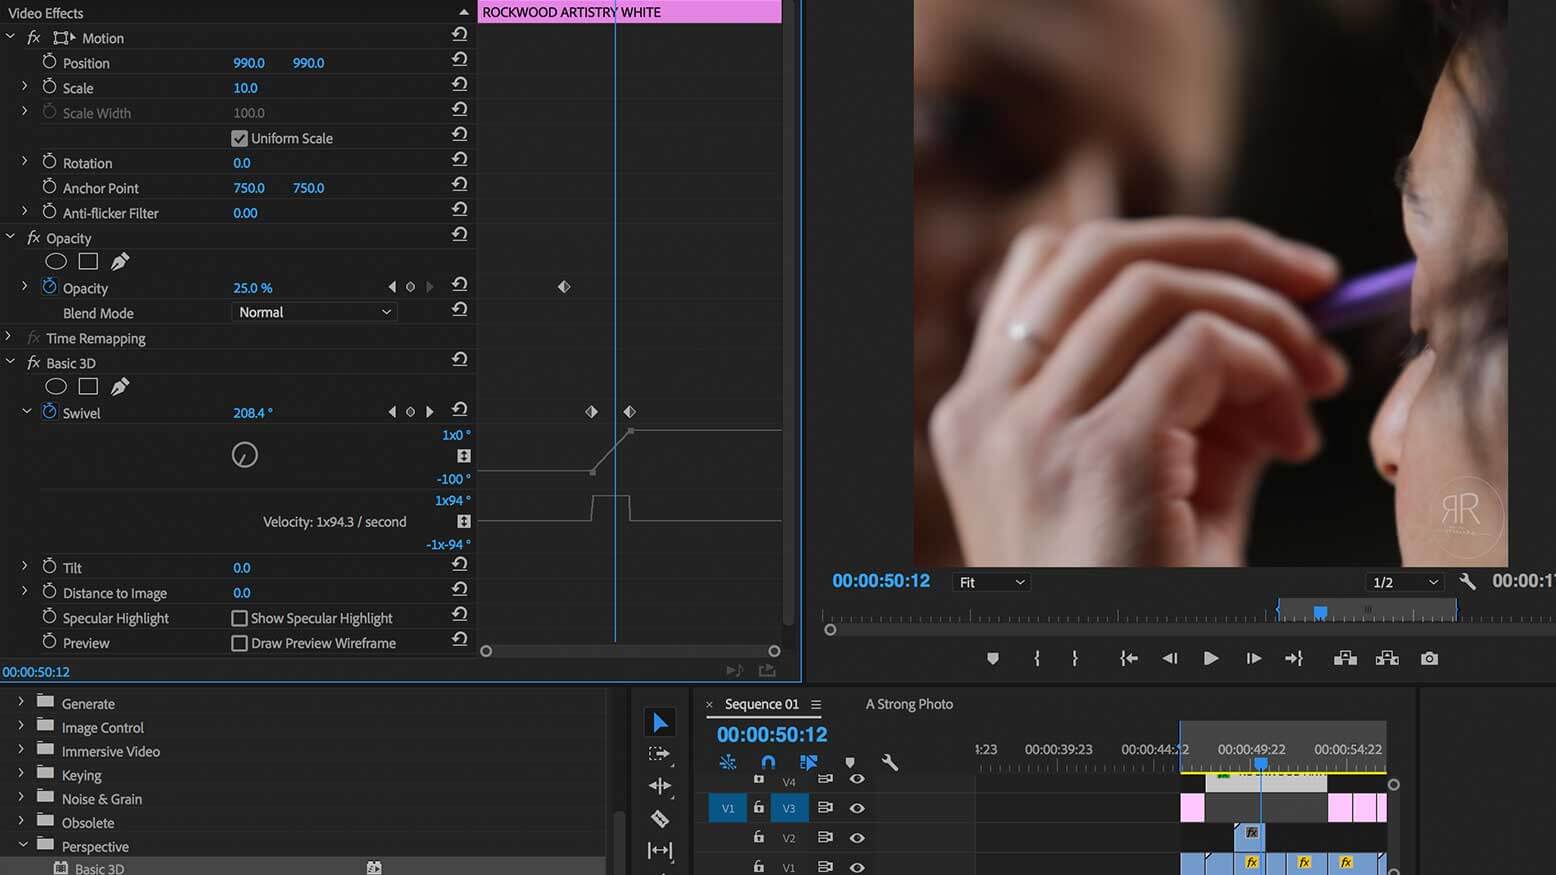
Brand like a pro. Market research suggests the average attention span while engaged on social media is less than 10 seconds. Brand your video within the first two seconds. Get your name out there first, and keep it up throughout the video. Put the company name up first, give it a little motion pizazz and move on to your video. Keep a small translucent brand/ID marker, or “bug,” in a corner of your video. You can even make your bug spin using the Swivel tool (Video Effects > Basic 3D > Swivel), and add a little flair to keep your viewers’ brains engaged.
Bonus Tip: Match up the last frame and first frame of your video to make your loop seamless. Instagram and Facebook automatically loop videos, and if your audience is engaged through multiple runs of your video, they are more likely to engage with your content.
Use the popular canon. Anchor your video with the familiar. I shot and edited Kat Robichaud’s “Song for David Bowie,” which tells the story of Robichaud hearing the news of Bowie’s passing. The link got listed on a Bowie subreddit and views spiked so quickly we thought a bot had to be to blame. Do you have an undying love for a cultural icon? Does a particular decade make you swoon? How can you use pop culture to theme your next video?
Authenticity is magic. With so much news and views thrown our way, it can be hard to pick out sincerity. If you are working to make an impact in a sea of information, the only you to put out there is with your most authentic self. That David Bowie video wouldn’t have worked for someone who is not a true superfan. You can fake it till you make it, but don’t try to sell a fake version of yourself or the company you are representing—you’ll end up creating more work for yourself to keep up a false image.
And there you have it. Mix and match these tips to create a video that will keep your audience engaged to hear your message. And don’t just take my word for it. Study your own social media use. What kinds of videos keep you engaged? How long are they holding shots before moving on? What kinds of videos keep you watching for an entire minute or more? Take note of their techniques and borrow where you see fit.
And remember, social media rules of engagement are constantly changing. Who knows, you might just create the next trend.


